
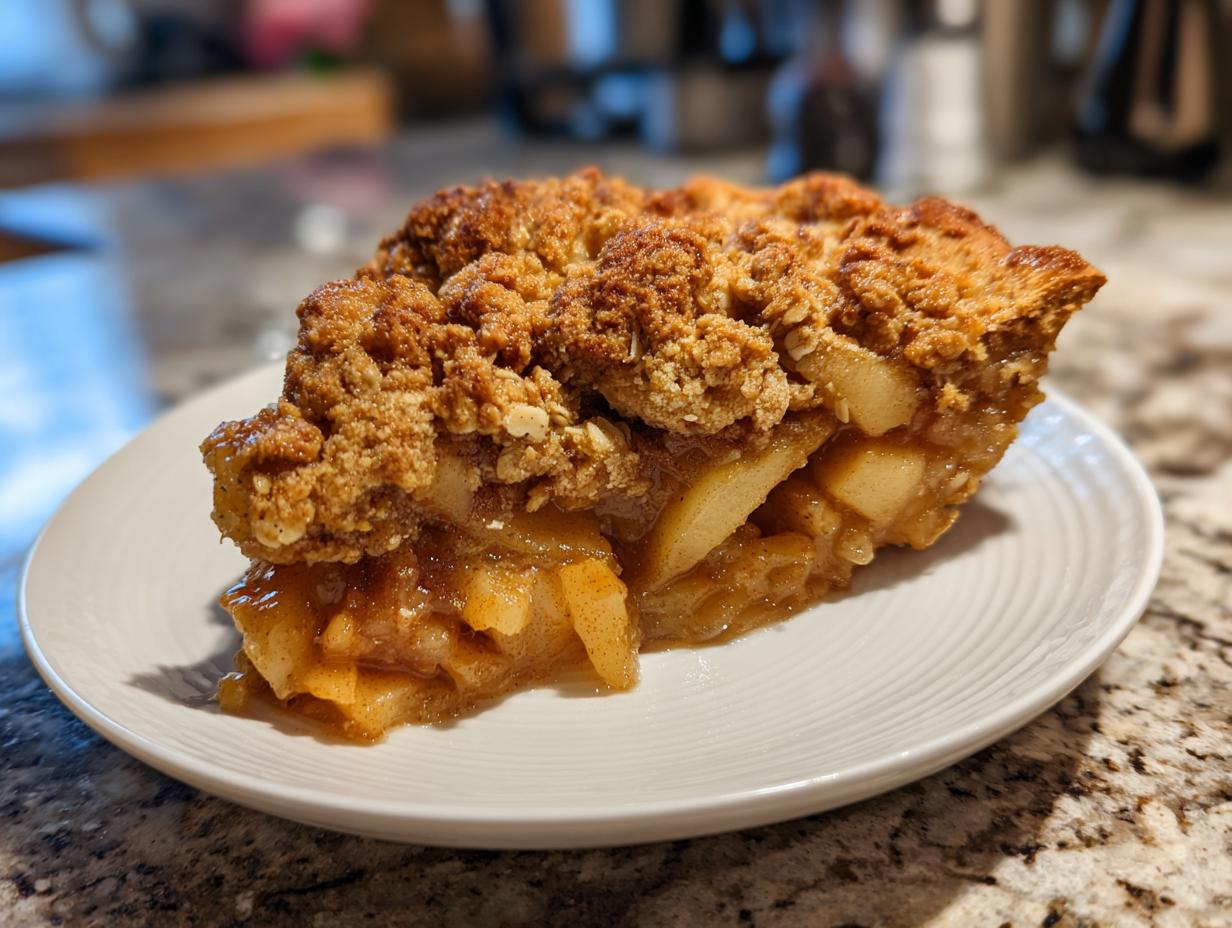
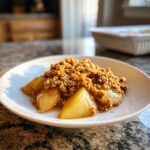
When the day is done and you’re craving something truly satisfying—that warm hug feeling—a complicated dessert just won’t cut it, right? That’s why here at Cheffinity, we focus on making real food magic happen fast. If you need a dessert that tastes like fall harvest but takes almost no fuss, you’ve found it. Our Easy Brown Sugar Cinnamon Pear Crisp is proof that a fantastic pear crisp can be ready in under an hour. This is exactly the kind of quick, flavorful success Ava Sinclair built this entire kitchen philosophy around: nourishing your family without draining your energy. This recipe delivers gooey, spiced pears and a buttery oat topping every single time. You’re going to love having this in your back pocket for those cozy weeknights! For more great ideas like this, check out our full collection of delicious dessert recipes.
- Why This Easy Brown Sugar Cinnamon Pear Crisp is Your New Go-To
- Ingredients for the Best Pear Crisp
- How to Prepare Your Easy Brown Sugar Cinnamon Pear Crisp
- Tips for the Ultimate Pear Crisp Success
- Variations: Customizing Your Cozy Fruit Crisp
- Serving Suggestions for this Rustic Pear Dessert
- Storage and Reheating Instructions for Leftover Pear Crisp
- Frequently Asked Questions About Making Pear Crisp
- Estimated Nutritional Data for This Homemade Pear Dessert
Why This Easy Brown Sugar Cinnamon Pear Crisp is Your New Go-To
I know what it’s like to stare a craving in the face while balancing a million other things. This recipe skips all the complicated steps that ruin a low-effort dessert. It gives you everything you want—sweet fruit, warm spice, and a crunchy top—without taking over your whole evening. It’s genuinely one of the easiest warm comforting treats you can pull together.
Why is this particular one my secret weapon?
Speed and Simplicity for Busy Schedules
Seriously, look at the clock! You only need 15 minutes of active time to prep everything. From fruit slicing to topping sprinkling, it’s fast. The whole process wraps up in under an hour total, which means you get that amazing, oven-baked smell wafting through the house without committing two hours to dessert prep. That aligns perfectly with our mission here at Cheffinity: making real food simple.
The Perfect Brown Sugar Crisp Topping Flavor
It’s all about that contrast, isn’t it? We let the pears get soft and jammy, kissed with cinnamon and nutmeg, and then we cover it all up with the absolute best part: that buttery oat topping. That hint of molasses from the brown sugar makes the brown sugar crisp topping taste rich and deeply autumnal. It’s a simple fruit dessert that tastes way more complex than it should!
Ingredients for the Best Pear Crisp
When I was developing this recipe, I realized the secret to the best pear crisp wasn’t fancy stuff—it was just using good, basic ingredients handled the right way. You don’t need a huge shopping list to make something spectacular. Trust me on the butter needing to be cold; it’s non-negotiable for that crumbly texture! If you need a lightning-fast caramel sauce to drizzle on top later, I shared my quick homemade salted caramel trick here, but for now, let’s focus just on the crisp itself.
- 6 medium ripe pears, peeled, cored, and sliced
- 1/4 cup granulated sugar
- 1 tablespoon lemon juice (This keeps our pears looking bright!)
- 1 teaspoon ground cinnamon
- 1/4 teaspoon ground nutmeg
- 1/2 cup all-purpose flour
- 1/2 cup packed brown sugar
- 1/2 cup rolled oats
- 1/4 teaspoon salt
- 6 tablespoons cold unsalted butter, cut into small pieces
How to Prepare Your Easy Brown Sugar Cinnamon Pear Crisp
This process is so straightforward, I wish I could bottle the feeling of getting this done before my kids even finish their homework! We’re breaking this down into three simple phases: getting the fruit ready, making that crunchy topping, and then letting the oven do the heavy lifting. Don’t worry if you’re not a baker; these steps are foolproof. If you love crispy desserts, make sure you check out how I adapt the technique for my apple crisp recipe!
Preparing the Pear Filling
First things first, get that oven heated up to 375 degrees Fahrenheit. While it’s warming, lightly grease your 8×8 baking dish—don’t skip that, we don’t want anything sticking!
In a nice big bowl, toss your sliced pears with the granulated sugar, that little squeeze of lemon juice (hello, brightness!), cinnamon, and nutmeg. This coating makes sure every bite is flavored just right. Once they’re nicely coated, pour them into your prepared dish and spread them out so they make one flat, happy layer underneath.
Creating the Buttery Oat Topping for Your Pear Crisp
Now for the best part! Grab a separate bowl for the topping mixture. Whisk together the flour, brown sugar, oats, and salt. This dry mix lays the foundation for flavor.
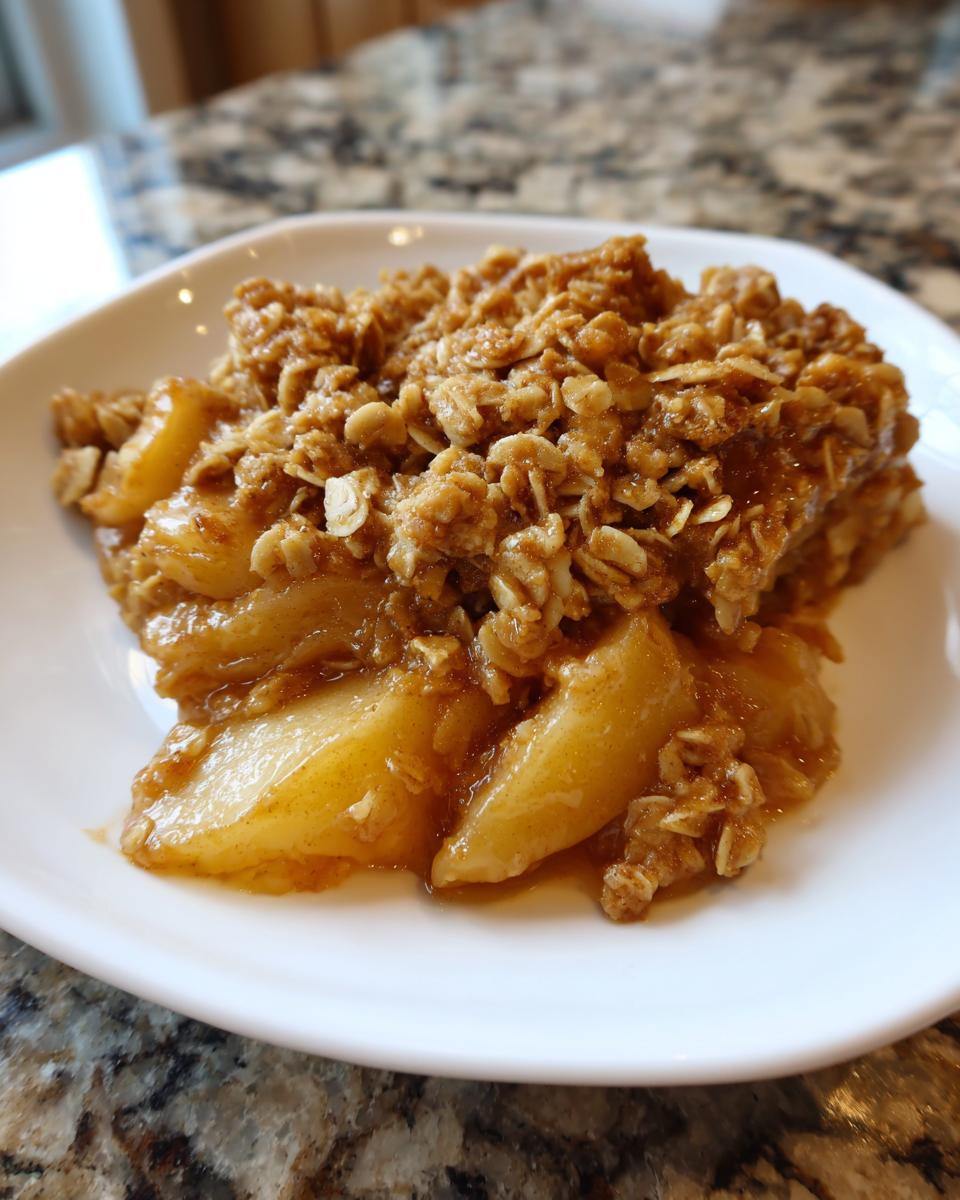
Next, bring in the cold butter chunks we cut up earlier. You need to cut that butter into the dry ingredients until it looks like coarse crumbs. I prefer using my fingertips for this; you can actually feel when it’s right! If you use a pastry blender, just pulse it carefully. You want bits of butter visible, not one uniform paste. That’s the key to having a gorgeous, crunchy pear crisp topping once it bakes up!
Baking and Resting the Pear Crisp
Take that beautiful oat mixture and sprinkle it evenly right over the pears. Try not to press it down; we want it loose so it can crisp up!
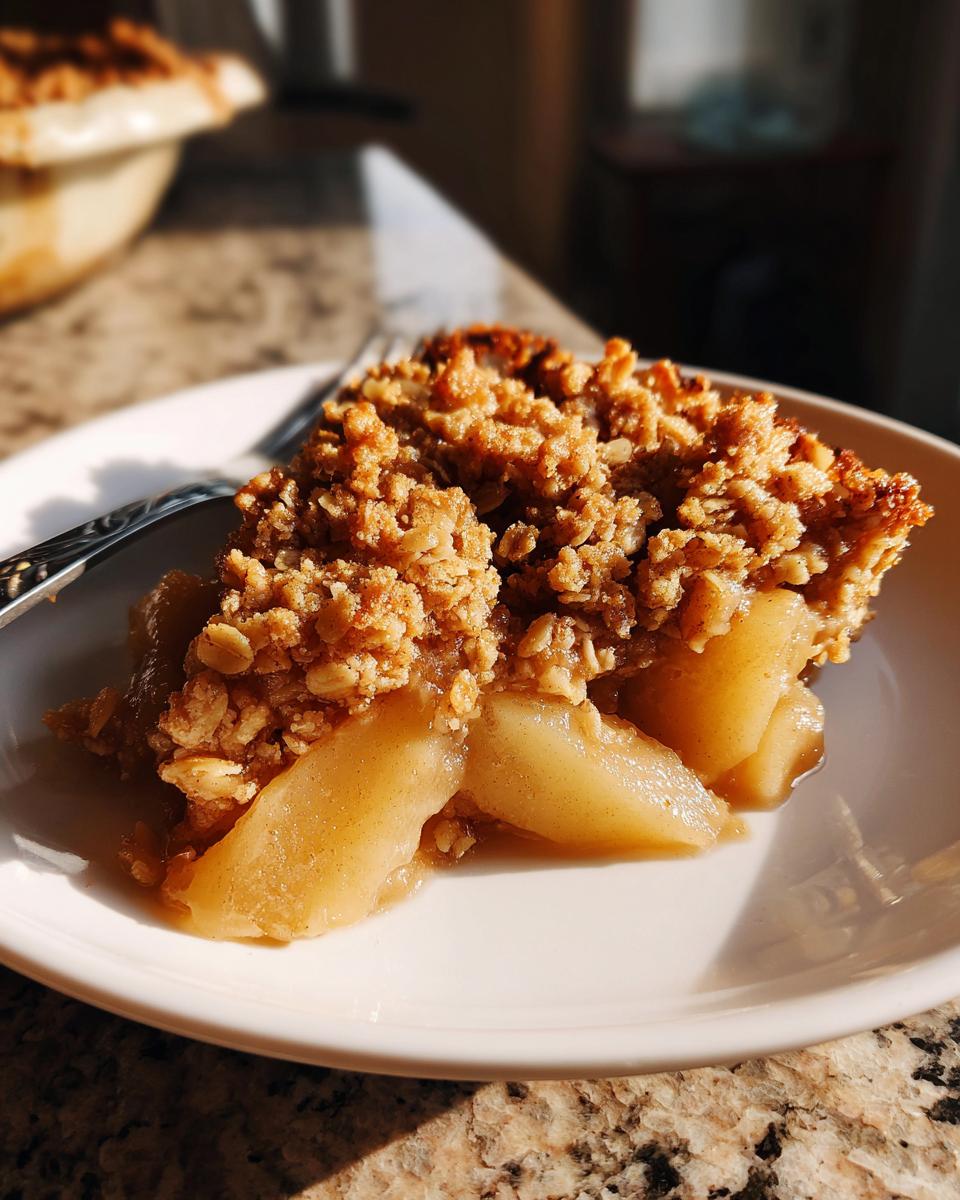
Bake this beauty for about 35 to 40 minutes. You’re looking for two things: the topping must be perfectly golden brown, and you should see the fruit filling bubbling up around the edges. That bubbling means it’s cooked through. The final, crucial step for any cinnamon pear crisp? Let it cool on the counter for at least 15 minutes. If you dig in immediately, you’ll burn your mouth and the filling will run everywhere. Patience pays off for the best pear crisp!
Tips for the Ultimate Pear Crisp Success
Making a great pear crisp is about trusting the process, but a few little chef insights can take it from good to absolutely unforgettable. Remember, we’re aiming for maximum cozy flavor with minimal stress. These tips are things I learned the hard way so you don’t have to!
Selecting and Preparing Pears for Your Pear Crisp
Your pears matter, folks. You don’t want mush, but you also don’t want rock-hard fruit that won’t soften during baking. I always look for Bartlett or Bosc that yield just slightly to gentle pressure—firm, but not tough. You absolutely need to peel and core these; nobody wants to bite down on pear skin or seeds in their dessert! Make sure your slices are uniform, about a quarter-inch thick, so they cook evenly throughout your pear crisp.
Adding Texture to the Oat Topping Dessert
The recipe calls for a simple, perfect topping, but if you want to bump up the crunch factor on your oat topping dessert, I highly recommend adding some nuts. It’s listed in the notes, but I insist you try it next time! About a quarter cup of chopped walnuts or pecans mixed right into the dry topping ingredients before you cut in the butter adds a fantastic savory dimension and a really satisfying textural element to the finished crisp.
Variations: Customizing Your Cozy Fruit Crisp
I love that this pear crisp is a perfect base recipe, meaning you can play around with it based on what you have in the fridge or what flavor mood you’re in. It’s all about adding seasonal flair while keeping that glorious, easy topping intact. It’s so fun to look at apple pear crisp alternatives when the season changes!
If you want to swap out or add fruit for a totally different vibe, I have a few ideas that work beautifully:
- For that beautiful tartness you sometimes crave, toss in about a cup of fresh or frozen cranberries along with your pears. They mix brilliantly with the brown sugar. If you’re experimenting with tart fruits, you might also like my recipe for cranberry orange bread!
- If you have some apples that are just a little too tart for eating raw, chop them up and mix them in with the pears. The apple pear crisp combination is classic for a reason—it balances the sweetness perfectly.
- Don’t forget spices! Next time, try adding a tiny pinch of ground cloves or even a small grating of fresh ginger to your pear mixture for a little zing.
Serving Suggestions for this Rustic Pear Dessert
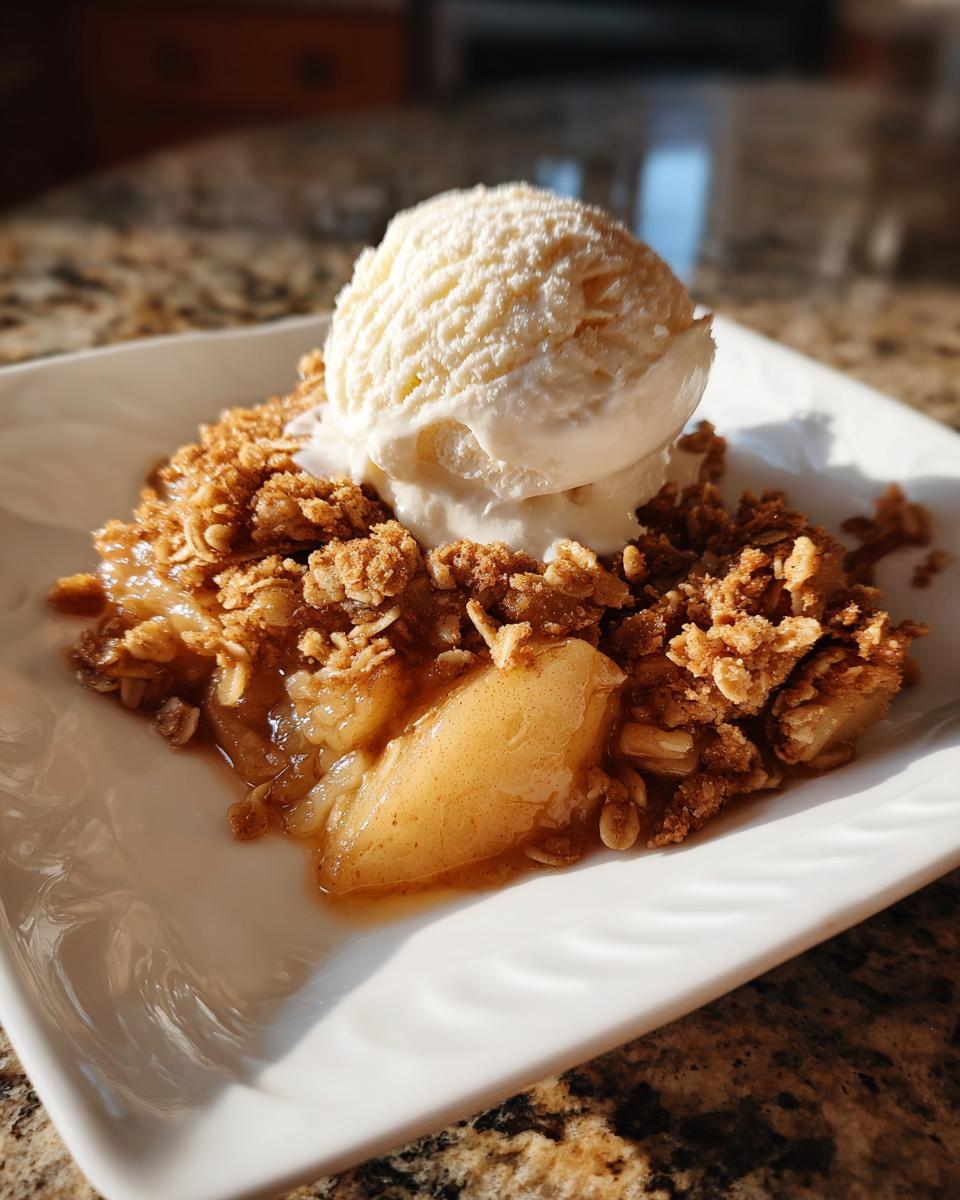
You know, I’m a firm believer that a dessert isn’t quite finished until you add that perfect finishing touch. Our rustic pear dessert is wonderful piping hot right from the oven, but it truly sings when you serve it warm alongside something cool and creamy. This balance of heat and cold just elevates everything, making it feel like a special occasion even if you threw it together on a Tuesday night.
The absolute classic pairing? A big scoop of good quality vanilla ice cream. The way the cold cream melts down into those bubbly, spiced pear juices? Heaven! If ice cream isn’t your thing, don’t worry; a drizzle of heavy cream or even a dollop of slightly sweetened whipped cream works just as well. For those who like a little extra flavor punch, try topping it with a scoop of cinnamon ice cream or maybe even a drizzle of caramel sauce—you can find my favorite easy recipe here, though that recipe is technically for cookies, the sauce works wonders on fruit too!
Storage and Reheating Instructions for Leftover Pear Crisp
Don’t worry if you end up with leftovers, though I doubt you will! This pear crisp is great the next day too. The best way to store any leftovers is tightly covered at cool room temperature for up to a day, or straight into the fridge if it’s humid or you made it way ahead of time. It should be good for about three to four days in the fridge.
When it comes to reheating, skip the microwave if you can! That will just steam the topping and make it soggy. For the best results, put individual servings on a small baking sheet and reheat them in a 350-degree oven for about 5 to 8 minutes. That little blast of dry heat wakes up the butter and crisps up that lovely oat topping again. Enjoying your reheated cinnamon pear crisp warm is just as comforting as the first time!
Frequently Asked Questions About Making Pear Crisp
I hear from so many folks who love this dessert but have little worries about getting the fruit texture just right, or keeping that topping from getting sad and soft! Don’t sweat it; these are all super common questions, and I’ve got the answers based on years of testing these simple fruit desserts. Getting this pear crisp perfect is all about a few easy tweaks.
What is the best type of pear to use for an easy pear crisp recipe?
This is so important for that perfect texture! You need pears that hold their shape when baked. If you go too soft, you end up with pear soup, and nobody wants that! Look for Bosc or Anjou pears; they stay firm and hold up beautifully to the heat. Bartlett is okay if you catch them when they are still quite firm—that slight bit of give is what you’re aiming for. If they feel mushy at the grocery store, save them for smoothies, not for your easy pear crisp recipe!
Can I prepare the pear crisp ahead of time?
Yes, you totally can! This is a lifesaver when you have company. The trick, though, is keeping the topping separate until the absolute last minute. You can slice and season your pears and put them into the greased baking dish, cover that tightly, and keep it in the fridge. But definitely keep the flour, sugar, butter, and oat mixture stored separately in an airtight container on the counter. Assemble it right before you want to pop it in the oven so that the butter stays cold and the topping stays crisp, not damp!
How do I ensure my oat topping dessert stays crunchy?
The crunch factor relies on two main things we talked about: starting with cold butter in the topping mix and baking at the right temperature. But here’s another pro tip for you: make sure your oven is fully preheated! If you toss the crisp in when the oven is only halfway there, the butter in the topping melts too slowly, starts to soak into the fruit, and you end up with a soggy mass instead of a fantastic oat topping dessert.

Also, try not to over-mix that topping; those little pockets of butter are what create that crisp texture when the heat hits them. If you’re looking for other ways to boost the crunch factor in your baking, you can check out my secrets for my easy apple crisp recipe too!
Estimated Nutritional Data for This Homemade Pear Dessert
When we talk about getting a delicious dessert on the table without compromising our goals, knowing what’s in it helps! Since this is a homemade pear dessert made with whole fruits and basic pantry staples, you often get a better nutritional profile than those super-processed bakery items. Keep in mind, these figures are just estimates based on the ingredients list we used here, so your exact numbers might shift a little based on the size of your fruit or how much butter you sneak into the topping!
- Serving Size: 1 serving
- Calories: 310
- Fat: 14g (Saturated Fat: 8g)
- Cholesterol: 30mg
- Sodium: 110mg
- Carbohydrates: 48g (Fiber: 5g)
- Sugar: 35g
- Protein: 3g
It’s a pretty balanced treat all things considered, especially for a warm comforting treat that comes together so quickly!
PrintEasy Brown Sugar Cinnamon Pear Crisp
You can make this simple pear crisp featuring tender pears and a buttery oat topping. It is a comforting dessert perfect for fall evenings or any time you need a warm treat.
- Prep Time: 15 min
- Cook Time: 40 min
- Total Time: 55 min
- Yield: 6 servings 1x
- Category: Dessert
- Method: Baking
- Cuisine: American
- Diet: Vegetarian
Ingredients
- 6 medium ripe pears, peeled, cored, and sliced
- 1/4 cup granulated sugar
- 1 tablespoon lemon juice
- 1 teaspoon ground cinnamon
- 1/4 teaspoon ground nutmeg
- 1/2 cup all-purpose flour
- 1/2 cup packed brown sugar
- 1/2 cup rolled oats
- 1/4 teaspoon salt
- 6 tablespoons cold unsalted butter, cut into small pieces
Instructions
- Preheat your oven to 375 degrees Fahrenheit. Lightly grease an 8×8 inch baking dish.
- In a large bowl, combine the sliced pears, granulated sugar, lemon juice, cinnamon, and nutmeg. Toss gently to coat the pears evenly.
- Pour the pear mixture into the prepared baking dish and spread into an even layer.
- In a separate medium bowl, prepare the topping. Combine the flour, brown sugar, rolled oats, and salt.
- Cut in the cold butter using a pastry blender or your fingertips until the mixture resembles coarse crumbs.
- Sprinkle the oat topping evenly over the pears in the baking dish.
- Bake for 35 to 40 minutes, or until the topping is golden brown and the fruit filling is bubbly.
- Let the crisp cool for at least 15 minutes before serving. Serve warm.
Notes
- For an extra layer of flavor, add 1/4 cup chopped walnuts or pecans to the oat topping mixture.
- If your pears are very firm, you can microwave the filling mixture for 2 minutes before topping to start the softening process.
- This dessert is best served warm with vanilla ice cream or whipped cream.
Nutrition
- Serving Size: 1 serving
- Calories: 310
- Sugar: 35g
- Sodium: 110mg
- Fat: 14g
- Saturated Fat: 8g
- Unsaturated Fat: 6g
- Trans Fat: 0g
- Carbohydrates: 48g
- Fiber: 5g
- Protein: 3g
- Cholesterol: 30mg