
Oh, that smell! You know the one—it stops conversation dead and pulls everyone toward the oven, right?
For me, baking bread used to feel like one of those weekend projects that just didn’t fit into our hectic week. But I refuse to compromise on real food just because time is tight. That’s why I spent ages perfecting this Italian bread recipe. Forget complicated artisan methods; this tutorial is about getting that incredible, bakery-style crusty exterior and a soft, chewy inside without spending all day hovering over the dough. This is Cheffinity solving the weeknight dilemma: real food without complexity. If you want to read more about our mission to simplify your kitchen time, check out our story. Trust me, you’ll be amazed how easy it is to make this loaf.
- Why This Homemade Italian Bread Recipe Works for Busy Cooks
- Ingredients Needed for Perfect Italian Bread
- Step-by-Step Guide to Making Easy Crusty Italian Bread
- Tips for Success When Baking Italian Bread at Home
- Serving Suggestions for Your Fresh Italian Bread
- Storage and Reheating Instructions for Leftover Italian Bread
- Frequently Asked Questions About Homemade Italian Bread Recipe
- Nutritional Estimates for This Italian Bread
- Share Your Bakery Style Italian Loaf Experience
Why This Homemade Italian Bread Recipe Works for Busy Cooks
The Cheffinity philosophy is built around saving you time, not adding stress. We test everything in the crucible of a real, chaotic kitchen, and this approach shines in this recipe. You don’t need special equipment or ancient techniques to get bakery-quality Results!
This recipe is designed for real life. You get those massive flavor payoffs with minimal sacrifice. Here’s what makes this the perfect loaf for your rotation:
- Minimal Ingredient List: We stick to basics you already have—flour, yeast, water, oil. No hunting down specialty flours needed for this version.
- Crust Magic: The steam technique is the secret sauce for that golden, crunchy exterior everyone craves.
- Perfect Texture Balance: You achieve that highly sought-after Soft Inside Crusty Outside Bread every single time.
- Less Stress, More Flavor: It fits perfectly into a busy schedule, meaning you can enjoy fresh bread any night. Head over to see more ideas for quick weeknight dinners!
Ingredients Needed for Perfect Italian Bread
I keep this ingredient list taped to my pantry door because it’s so simple—you likely have everything on hand already. Remember, the quality of your basic ingredients really matters here, especially the temperature of your water!
- 3 1/2 cups all-purpose flour
- 1 1/2 teaspoons salt
- 1 teaspoon granulated sugar
- 2 1/4 teaspoons active dry yeast (that’s one standard packet!)
- 1 1/2 cups warm water (make sure this is between 105-115°F, or it won’t foam up right!)
- 2 tablespoons olive oil, plus extra for coating the bowl
Step-by-Step Guide to Making Easy Crusty Italian Bread
This is where the magic happens, but honestly, don’t sweat it! This process is straightforward, making it fantastic for Beginner Bread Making. We break down the steps so you can focus on the dough, not the clock. Just follow along, and you’ll have that amazing aroma filling your house soon.
Mixing the Dough and Activating the Yeast
First things first, we wake up the yeast. In a small bowl, whisk your yeast into the warm water. Those 105–115°F instructions? They aren’t suggestions; they’re critical! If the water is too cold, the yeast sleeps; too hot, and you kill it. Wait about five minutes until it gets nice and foamy—I always check for that happy foam, it’s my first sign of success. While that’s happening, mix your flour, salt, and sugar in your big bowl.
Kneading and the First Rise for Your Italian Bread
Time to bring it all together. Pour that bubbly yeast mixture right into your dry ingredients along with the olive oil. Mix it until it just turns into a shaggy mess. Now, turn it out onto the counter. Kneading is important for this recipe; you need to work it for 8 to 10 minutes until it feels smooth, pliable, and elastic. When you press it, it should slowly spring back. After that elbow grease, lightly coat a clean bowl with oil, pop your dough in, cover it tight, and let it chill out in a warm spot for 1 to 1.5 hours until it’s doubled. Getting the rise right is key to a great italian bread.
Shaping and Final Proofing
Once doubled, you need to gently deflate that air—don’t punch it aggressively, just press down lightly! Now, shape it however you like; maybe a rustic oblong for that Bakery Style Italian Loaf look, or straight into a standard loaf pan if you prefer structure. Place your shaped dough on parchment paper and cover it loosely again. This second rise is shorter, maybe 30 to 45 minutes. It needs that time to relax before it hits the heat.
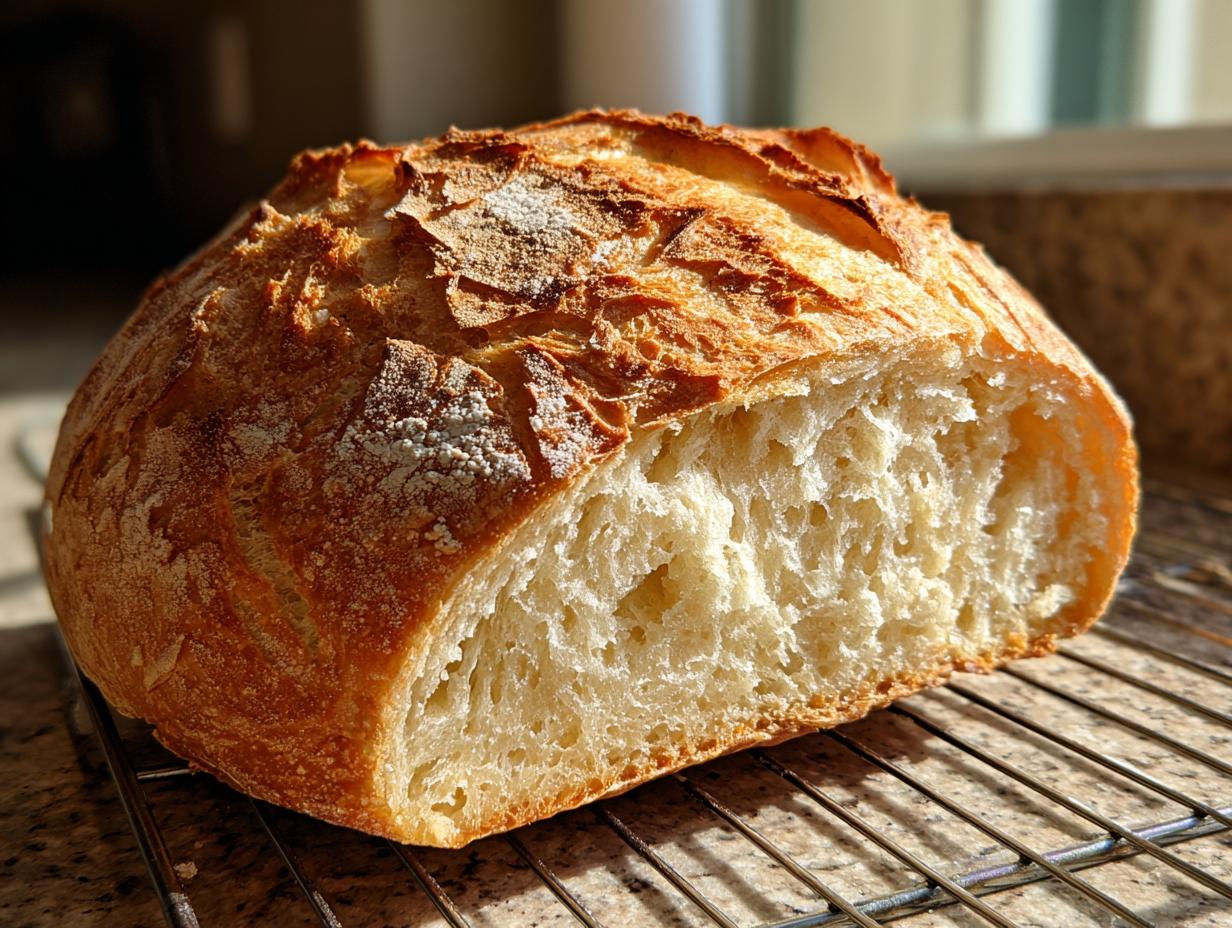
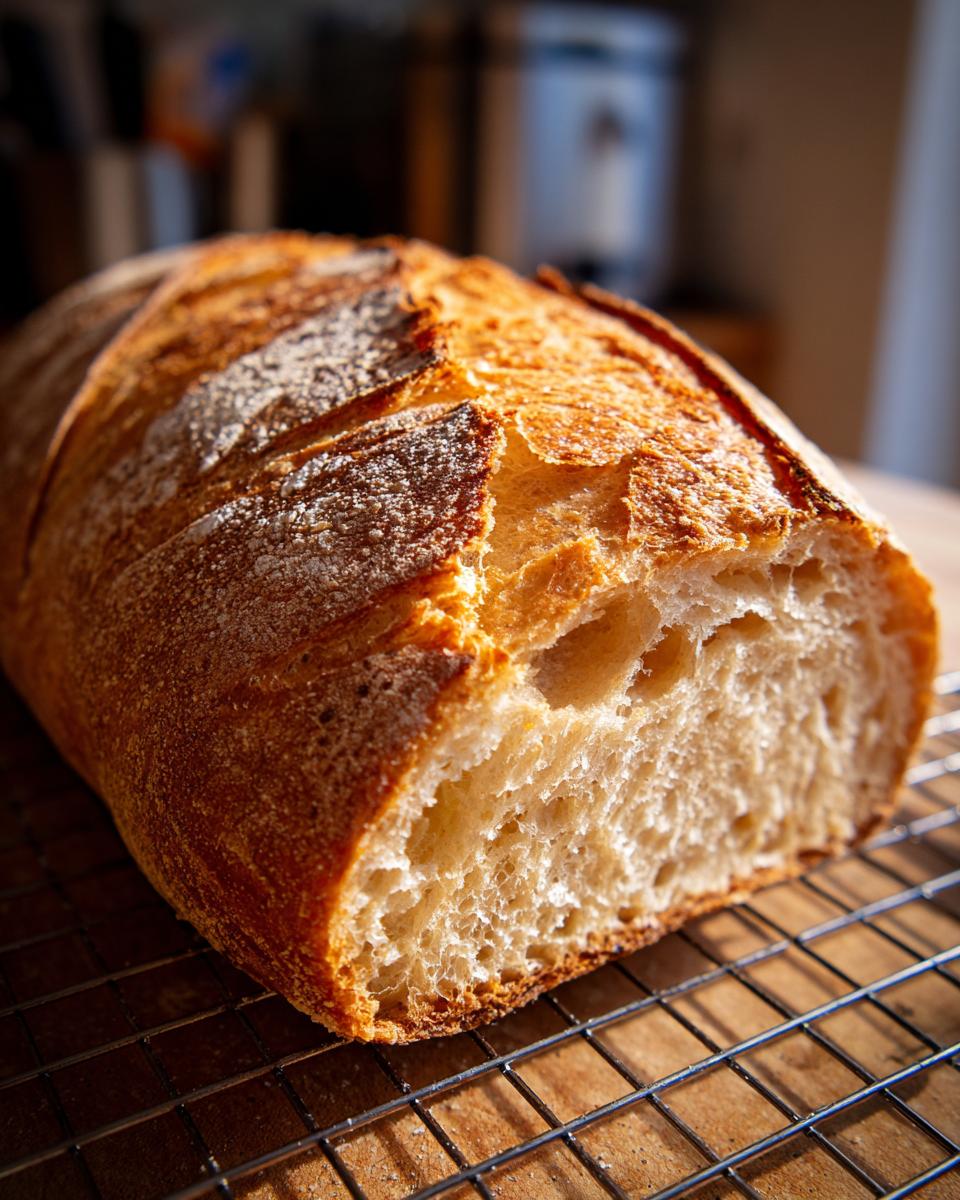
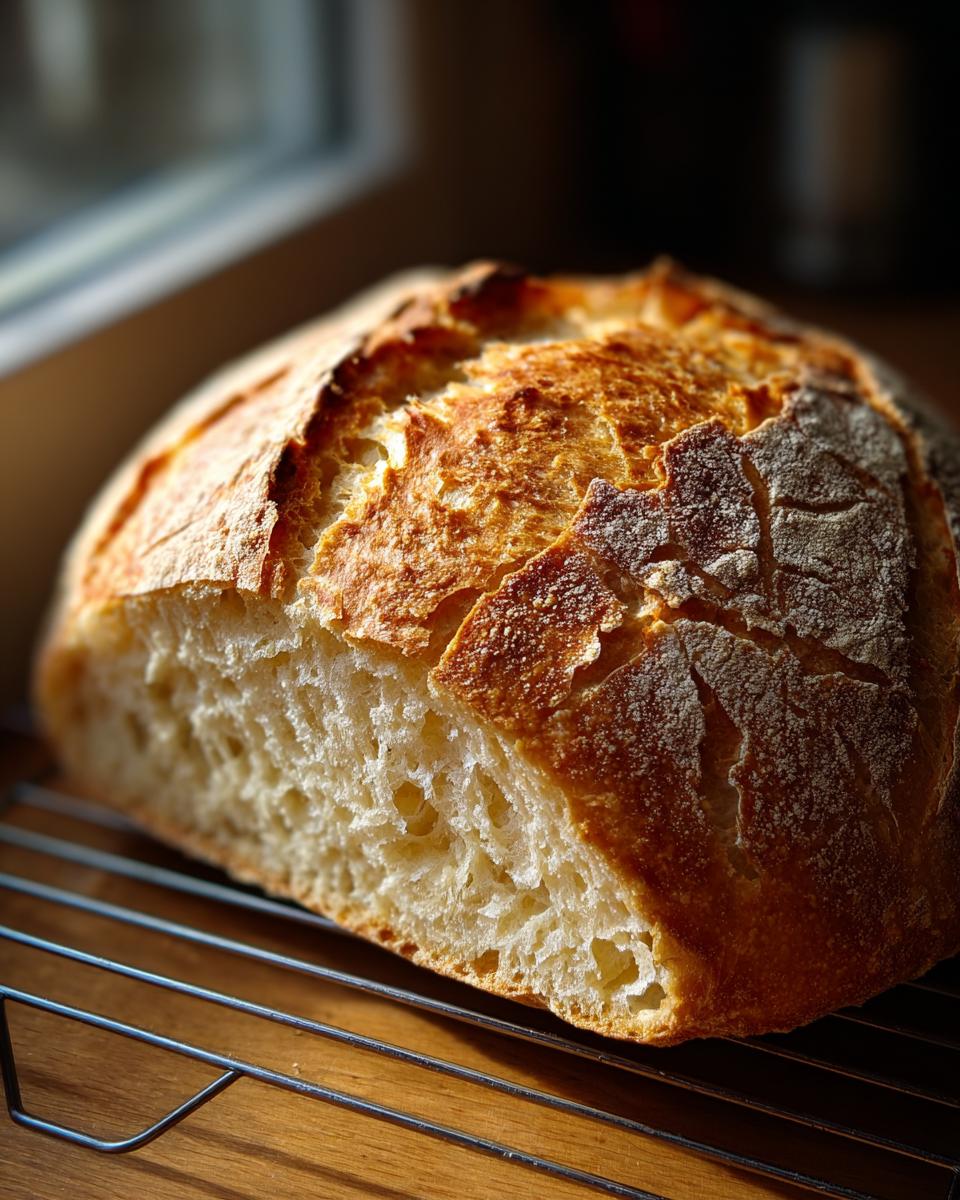
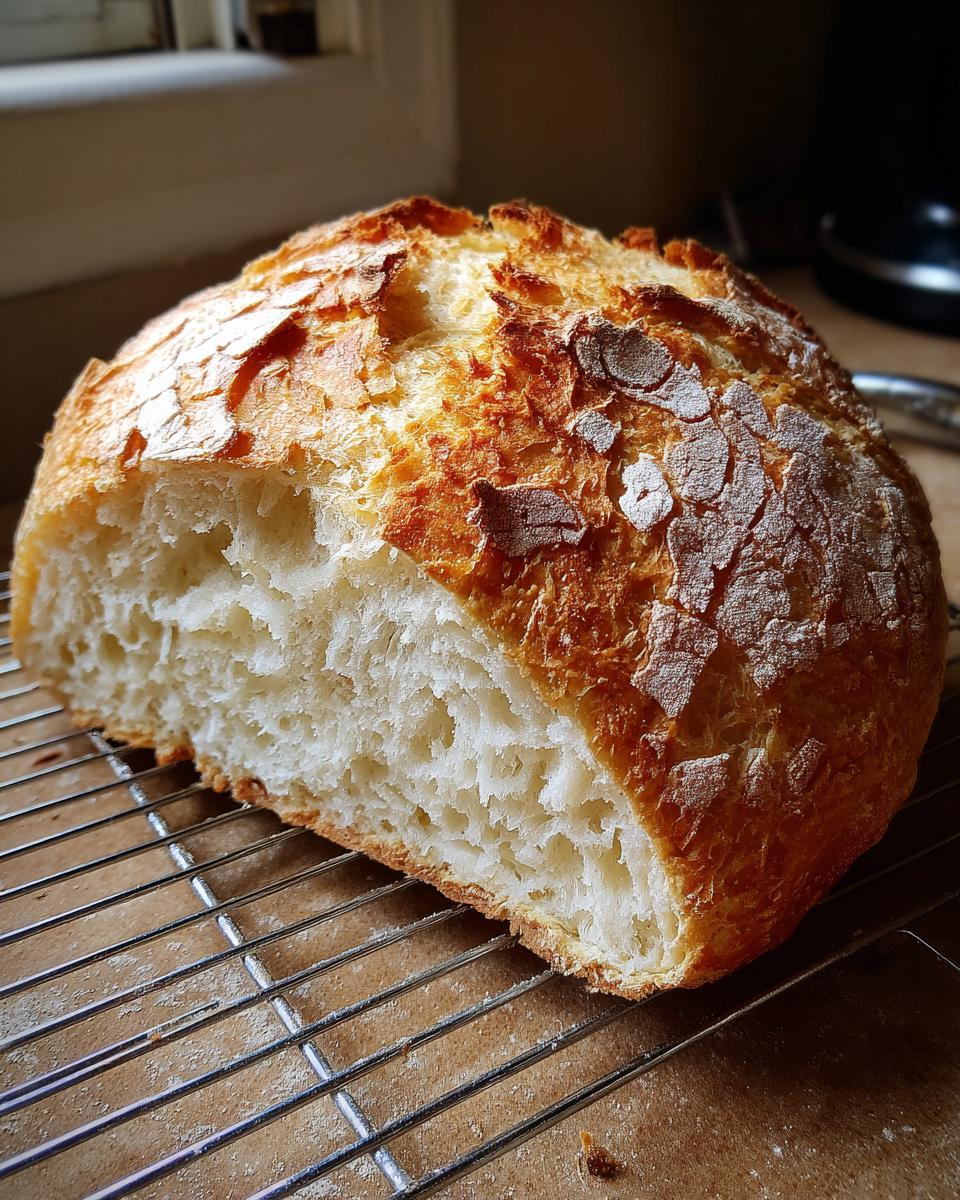
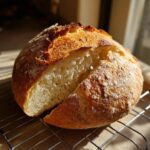
Achieving the Golden Brown Crust Bread Finish
Get your oven HOT—400°F is the spot. Here’s the professional trick: put a shallow pan on the bottom rack while it preheats. Right before that loaf goes in, brush the top surface lightly with water; this encourages the crust to develop that beautiful sheen. When you slide the italian bread in, quickly pour a cup of hot water into that lower preheated pan to create steam. This humidity is what gives you that incredible, crunchy exterior! Bake for 30 to 35 minutes until it’s deep golden brown. That beautiful steam crust will make your whole house smell incredible!
For making quick breads like this, I highly recommend checking out my guide on easy garlic naan bread if you want to continue practicing your technique!
Tips for Success When Baking Italian Bread at Home
Look, baking is chemistry, but making great bread is also about instinct and knowing how to cheat the system a little! For this Easy Crusty Bread Baking, it all comes down to managing moisture when that dough hits the oven. I want that fantastic, crackly crust for dipping, but if you’re making sandwiches later, you might want a softer edge.
The steam trick we used earlier—that hot water in the bottom pan—is non-negotiable for that perfect golden, crunchy crust. I sometimes even spritz the inside walls of the oven two or three times during the first ten minutes of baking. That burst of steam keeps the exterior soft just long enough for the loaf to expand fully before the crust sets hard. If you skip the steam, you’ll end up with a dense crust that doesn’t have that wonderful audible crackle when you slice it.
Now, here’s the tip for when you need a softer edge: Skip the final water brush before it goes in the oven. That water wash contributes a lot to the crispness. If you want a softer dinner side bread, just skip that step entirely, and you’ll get a more tender exterior. For more detailed explanations on getting that perfect crust every time, check out this great resource on baking the perfect crust!
Also, please, please, please let it cool! Patience is part of the baking lesson. Slicing into hot bread releases steam, and that steam is what makes the inside chewy and soft. Slice it too soon, and you end up with a gummy interior, even if the outside looks perfect.
Serving Suggestions for Your Fresh Italian Bread
Okay, the oven is off, the bread is cooling (don’t peek too early!), and now you get to enjoy the fruit of your labor. Honestly, this loaf is so good, you could just eat it plain. But why stop there?
This is the ultimate companion for almost any Italian-inspired meal. The absolute classic? Slicing it thick and bringing it to the table with a small dish of good quality olive oil mixed with some cracked black pepper and balsamic vinegar. It’s one of my favorite Dipping Bread Recipes because it requires zero effort and tastes like you pulled it from an authentic trattoria.
But don’t limit yourself! It’s sturdy enough for hearty meatball subs or soaking up the last bit of sauce from your pasta dishes. If you’re looking for something savory to serve alongside, try my recipe for easy dumpling sauce—you can dip the bread in that, too! Or, make a fancy appetizer by spreading some homemade garlic aioli recipe on a warm slice.
Storage and Reheating Instructions for Leftover Italian Bread
Even though this loaf rarely lasts past dinner, sometimes you have a little bit of delicious italian bread left over. My goal is always to keep that crust crackly, which is tricky because moisture escapes fast!
For short-term storage—think one day—wrap the cooled bread tightly in parchment paper first, and then place it in a plastic bag. Keep it on the counter, not in the fridge; cold air dries bread out completely! If you want to revive that fresh-from-the-oven magic, just spritz the whole loaf lightly with water and pop it into a 350°F oven for about 8 minutes. That blast of heat re-crisps the exterior, and you are back in business.
Frequently Asked Questions About Homemade Italian Bread Recipe
I get so many great questions about this loaf once folks start baking it! It’s totally normal when you step into Beginner Bread Making to have a few uncertainties. We want you to feel 100% confident when you pull that golden beauty out of the oven. Here are the ones I hear most often about getting that perfect structure and flavor.
Can I make this Italian Bread without kneading?
For this specific recipe, I really recommend against skipping the kneading. Remember, we are aiming for that perfectly Chewy Italian Loaf texture, and that structure is built by developing the gluten network through kneading. If you skip it entirely and go for a pure no-knead method, you’ll end up with something much closer to a wetter ciabatta or a simpler, softer sandwich loaf. You absolutely *can* make a no-knead version, but you’ll lose that signature dense chewiness that makes this Homemade Italian Bread Recipe so fantastic for dinner sides!
What is the best flour to use for crusty bread baking?
In this recipe, I specifically list all-purpose flour because it’s what we have 99% of the time. It gives us a fantastic result and an easy texture to handle for the initial rise. However, if you want to upgrade to an even chewier crumb, try swapping out about a quarter of the all-purpose flour for bread flour. Bread flour has higher protein, which builds stronger gluten strands, giving you an even more satisfying pull when you tear the bread apart. It’s a great step up once you master this basic loaf!

Have a question that isn’t covered here? Don’t hesitate to reach out to us through our contact page!
Nutritional Estimates for This Italian Bread
We measure success in minutes saved, but I know many of you still track what you’re eating! Keep in mind these numbers are purely estimates based on the ingredients laid out above, so they aren’t set in stone, but they give you a good baseline for enjoying this wonderful italian bread guilt-free.
- Serving Size: 1 slice
- Calories: 150
- Sugar: 0.5g
- Sodium: 250mg
- Fat: 2g
- Saturated Fat: 0.3g
- Unsaturated Fat: 1.7g
- Trans Fat: 0g
- Carbohydrates: 30g
- Fiber: 1.5g
- Protein: 5g
- Cholesterol: 0mg
Share Your Bakery Style Italian Loaf Experience
Now that you’ve mastered the trick for that golden, crunchy crust, I really want to see what you’ve made! We built Cheffinity to be a community where busy people realize they *can* make incredible food, and your success stories—especially with that perfect Bakery Style Italian Loaf—are the best part of my day.
Did you manage to get that crisp exterior just right? Did you dip it in high-quality olive oil, or sneak a slice while it was still cooling down (I won’t tell if you promise the secret)? Please drop a rating below—it helps other busy parents and cooks figure out which recipes they need next. And if you post a picture of your dinner spread featuring this delicious loaf, tag us! You can also check out my favorite dessert recipe for classic chocolate chip cookies when you need a sweet break!
If you want to see how another home baker tackled this loaf, take a peek at what they made over at Simple Italian Bread | Family Favorites. Happy baking, and keep bringing that real food ritual back to your table!
PrintEasy Crusty Homemade Italian Bread Recipe
Bake bakery-style Italian bread at home with this simple recipe. You achieve a golden, crunchy crust and a soft, chewy interior using basic pantry ingredients.
- Prep Time: 20 min
- Cook Time: 35 min
- Total Time: 2 hours 35 min
- Yield: 1 large loaf 1x
- Category: Bread
- Method: Baking
- Cuisine: Italian
- Diet: Vegetarian
Ingredients
- 3 1/2 cups all-purpose flour
- 1 1/2 teaspoons salt
- 1 teaspoon granulated sugar
- 2 1/4 teaspoons active dry yeast (1 packet)
- 1 1/2 cups warm water (about 105-115°F)
- 2 tablespoons olive oil, plus more for coating
Instructions
- In a large bowl, mix the flour, salt, and sugar.
- In a separate small bowl, dissolve the yeast in the warm water and let it sit for 5 minutes until foamy.
- Pour the yeast mixture and the olive oil into the dry ingredients. Mix until a shaggy dough forms.
- Turn the dough out onto a lightly floured surface. Knead for 8 to 10 minutes until the dough is smooth and elastic.
- Lightly coat a clean bowl with olive oil. Place the dough in the bowl, turning to coat. Cover the bowl with plastic wrap or a clean towel.
- Let the dough rise in a warm place for 1 to 1.5 hours, or until doubled in size. This is your first rise.
- Gently punch down the dough. Shape it into a loaf or two smaller loaves. Place the shaped dough on a baking sheet lined with parchment paper or in a prepared loaf pan.
- Cover the dough loosely and let it rise again for 30 to 45 minutes. This is your second rise.
- Preheat your oven to 400°F (200°C). Place a shallow pan on the bottom rack to create steam.
- Before baking, lightly brush the top of the loaf with water for a crispier crust. You can score the top with a sharp knife if desired.
- Bake for 30 to 35 minutes, or until the crust is deep golden brown and the internal temperature reaches 200°F (93°C).
- Remove the bread from the oven and cool completely on a wire rack before slicing.
Notes
- For an extra crunchy crust, spray the inside of the oven walls with water a few times during the first 10 minutes of baking.
- This bread is excellent for dipping in olive oil or serving alongside pasta dishes.
- If you prefer a softer crust, skip the final water spray before baking.
Nutrition
- Serving Size: 1 slice
- Calories: 150
- Sugar: 0.5
- Sodium: 250
- Fat: 2
- Saturated Fat: 0.3
- Unsaturated Fat: 1.7
- Trans Fat: 0
- Carbohydrates: 30
- Fiber: 1.5
- Protein: 5
- Cholesterol: 0