
You know that feeling when you crave a truly show-stopping, bakery-quality dessert—something intensely rich and decadent—but the thought of fiddling with graham cracker crusts, ramekins, and fussy water baths makes you reach for the phone instead? I totally get it. That’s why I’m obsessed with this basque cheesecake. It’s the answer to that whole dilemma! This isn’t about complex techniques; it’s about applying the Cheffinity philosophy directly to dessert: we save time and skip the fuss without sacrificing the wow factor. Ava Sinclair brings that same efficiency to sweet treats that she uses for weeknight dinners, meaning you get that gorgeous, deeply caramelized top and a silky, dreamy interior, all with practically zero stress. This recipe is your shortcut to gourmet.
- Why This is the Best Easy Basque Cheesecake Recipe
- Ingredients for Your Basque Cheesecake
- How to Prepare the Easy Cheesecake Recipe
- Tips for Success with Your Burnt Basque Cheesecake
- Serving Suggestions for Your Decadent Dessert Ideas
- Storage and Reheating Instructions for Basque Cheesecake
- Variations: Loaf Pan Basque Cheesecake and More
- Frequently Asked Questions About Basque Cheesecake
- Nutritional Estimate for This Simple Ingredients Cheesecake
Why This is the Best Easy Basque Cheesecake Recipe
When I first tried making this, I couldn’t believe how much punch this recipe packs for such a **minimal effort dessert**. Seriously, this is my go-to when I need something that looks like I spent all day on it but only took minutes of actual work. The best part? It skips the fussy water bath entirely—which is usually where every other cheesecake recipe loses me forever.
It truly delivers that ultra-rich, **creamy cheesecake recipe** experience you expect from a high-end bakery. It’s pure indulgence without the intimidation factor.
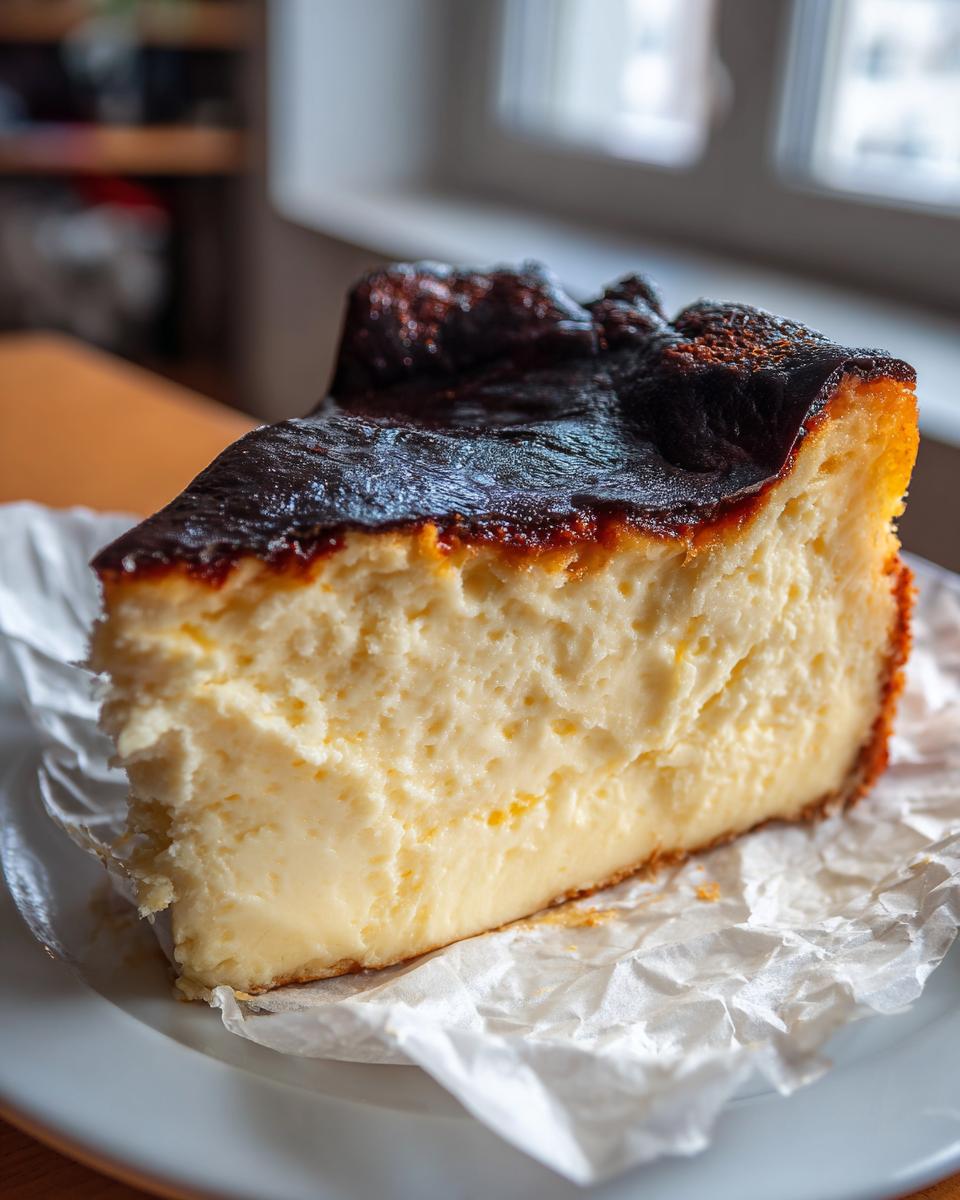
Achieving the Signature Caramelized Top Dessert
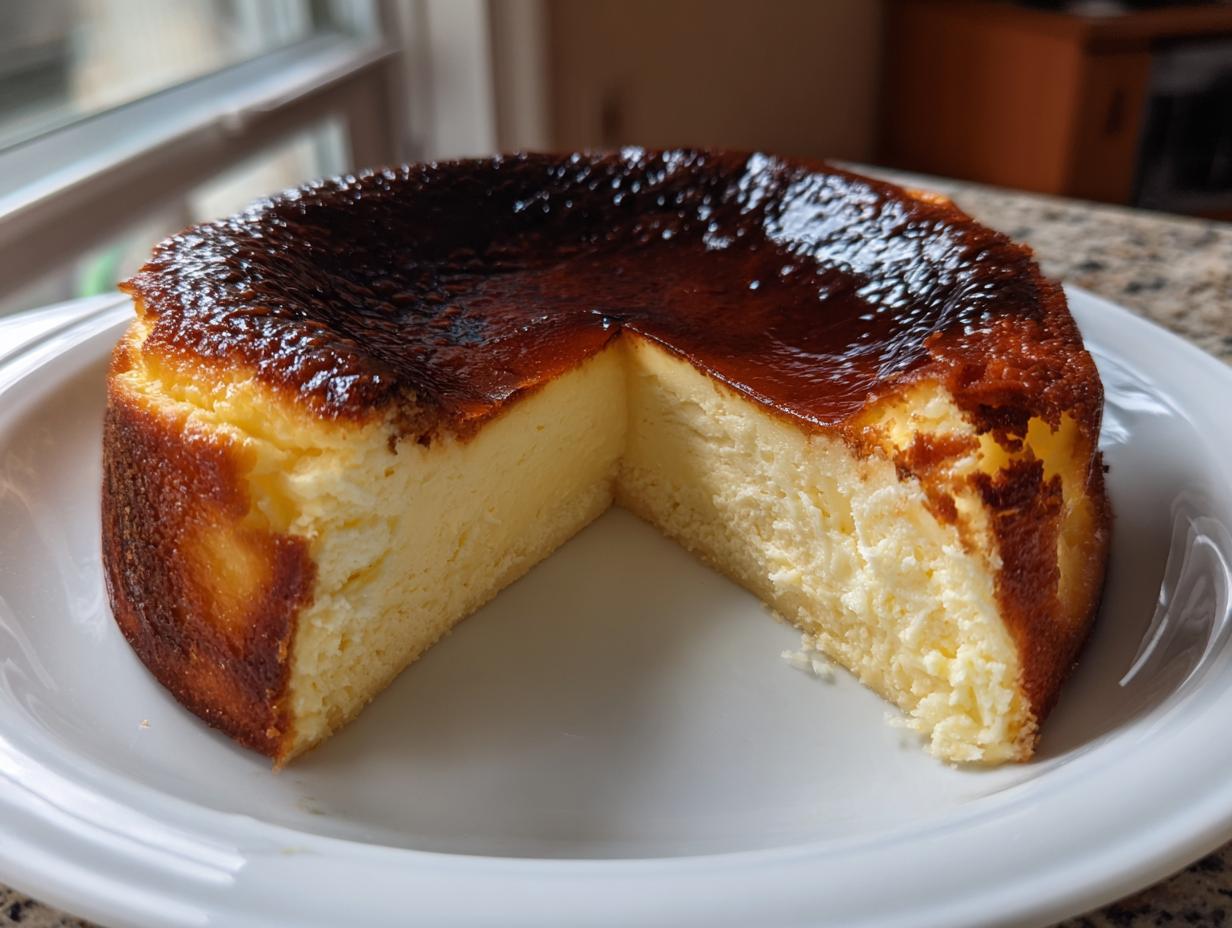
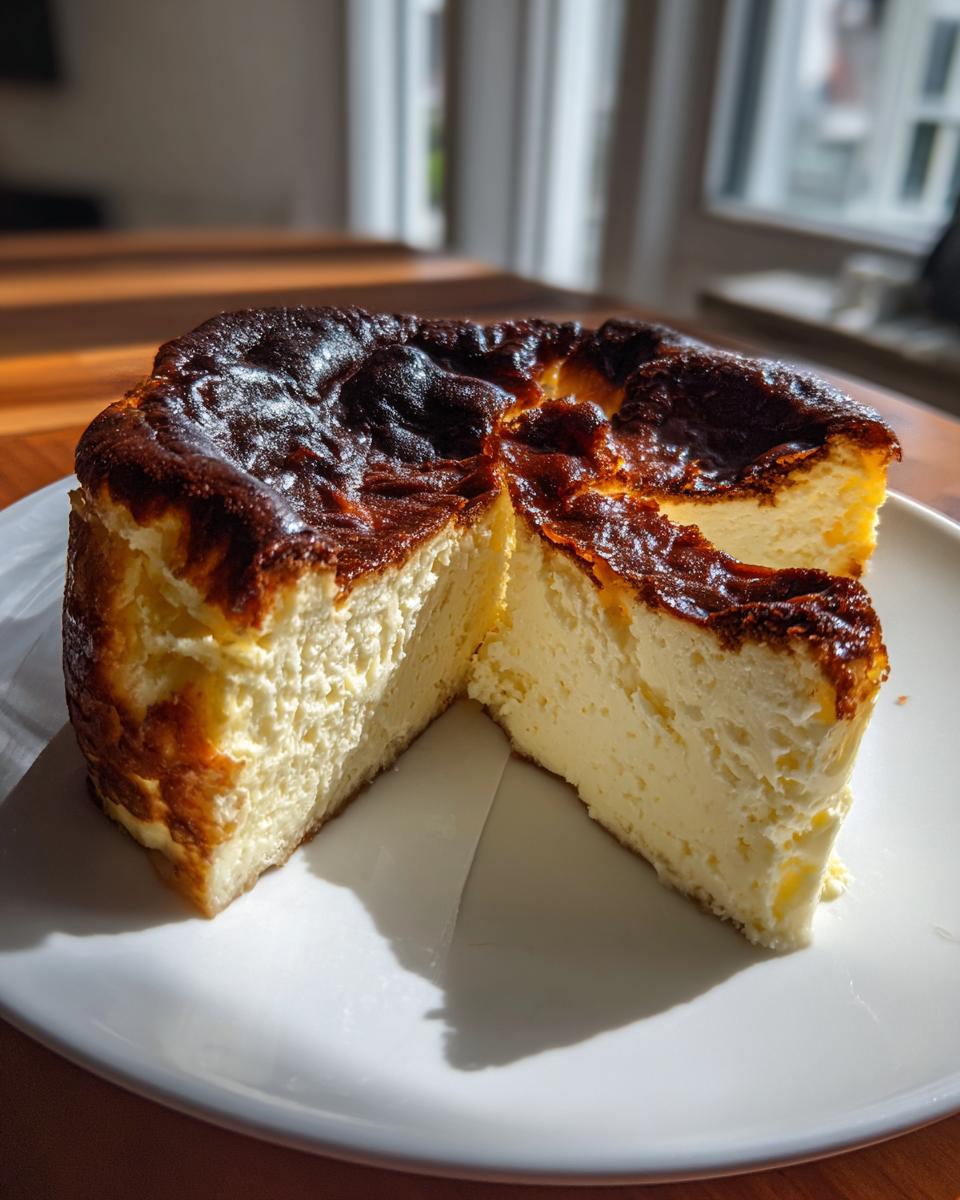
That dark, almost black top is everything! That deeply caramelized exterior is the whole point; it’s the signature look of an authentic basque cheesecake, really. We achieve that by cranking the oven heat way up. Don’t be scared when it looks like it’s burning—that’s exactly what we want to create the slight bitter contrast against the sweet interior!
The Secret to a Custardy Center Dessert
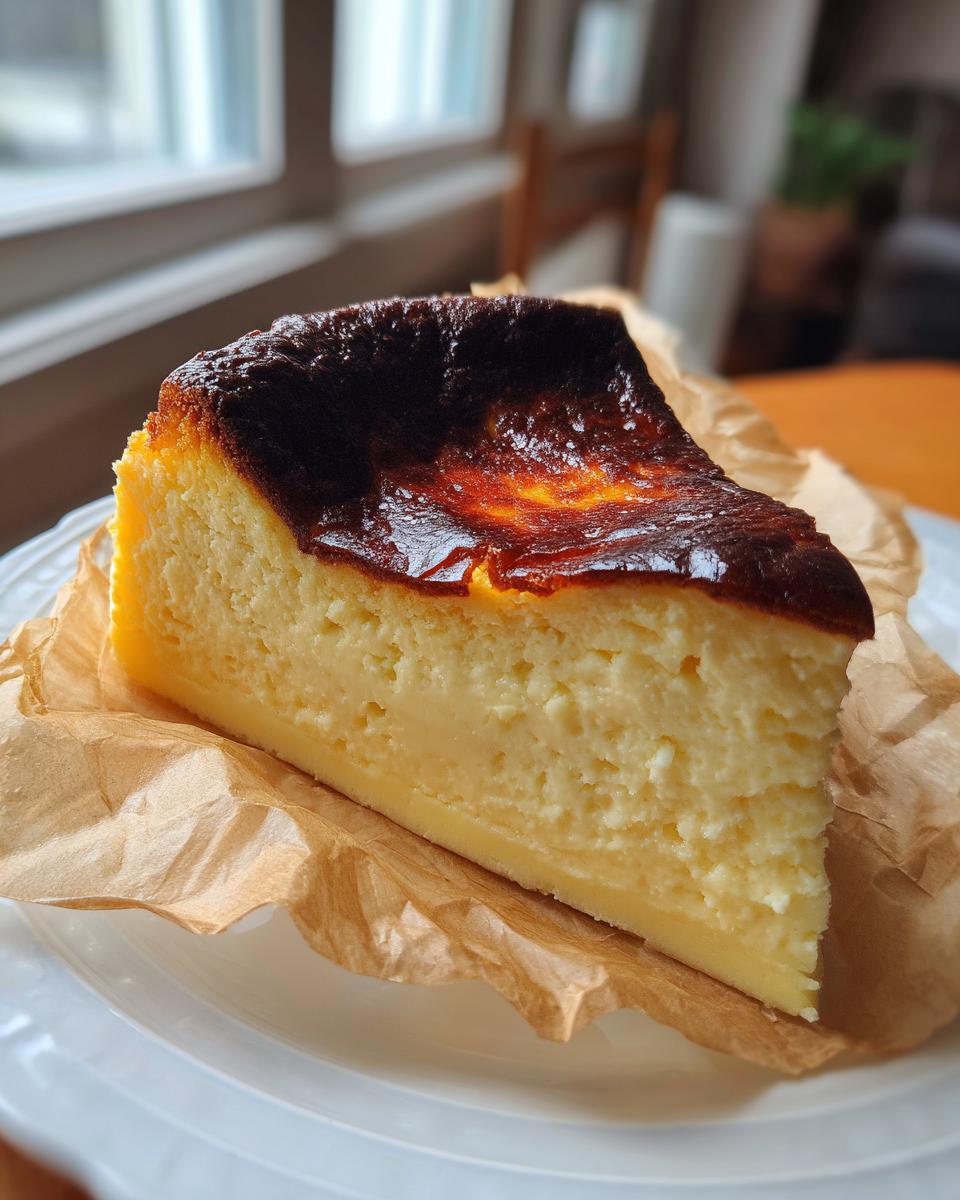
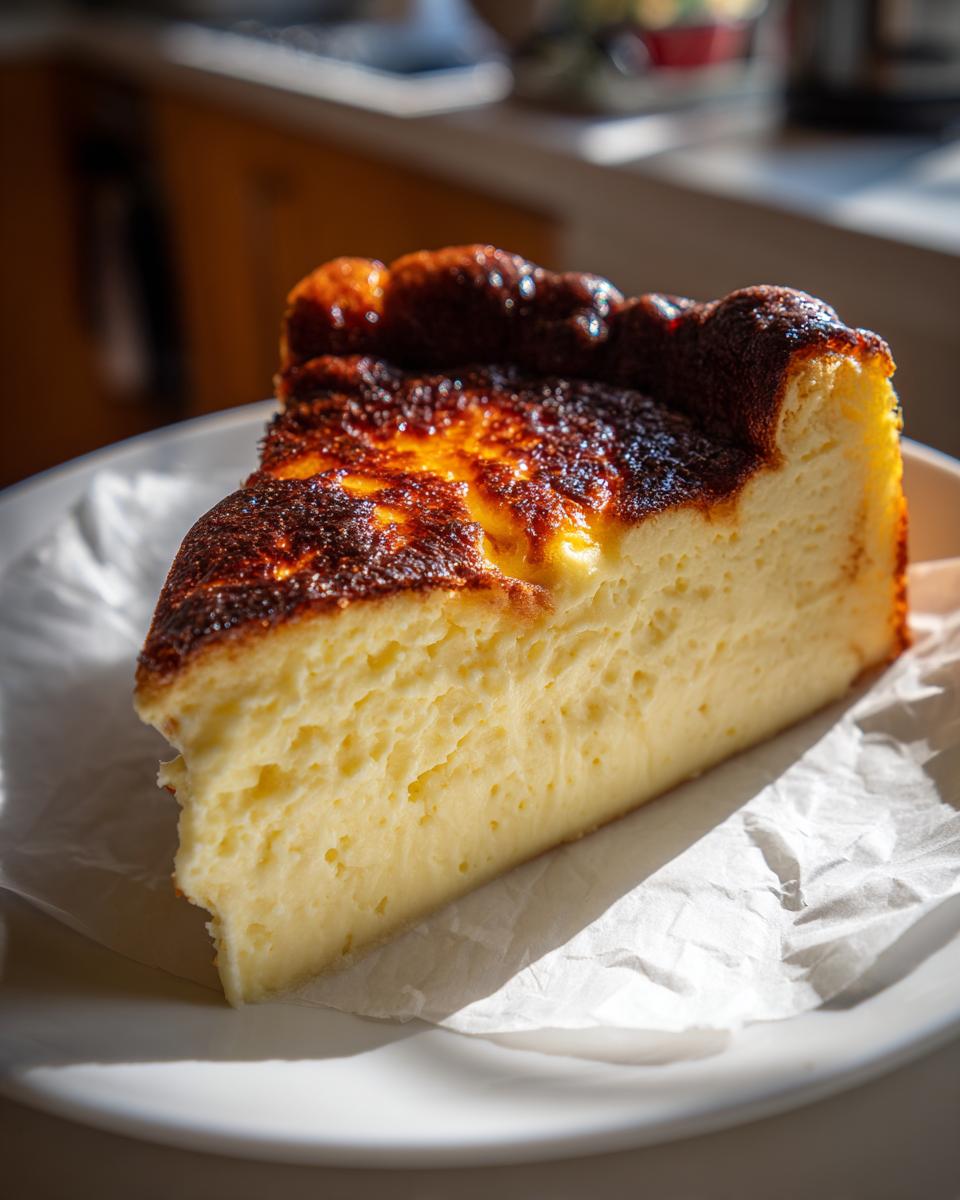
The textural magic comes from just a few key choices. You must use the full-fat cream cheese, that’s non-negotiable for the proper mouthfeel! And please, please don’t overbeat the eggs once they are in there. We are aiming for that famously wobbly, soft center, just like the classic San Sebastian Cheesecake style. That wobble is your signal that it’s done and going to set up perfectly as it cools.
Ingredients for Your Basque Cheesecake
Pulling this together is so simple because we are using just a few powerhouse ingredients! You’ll need 900g of full-fat cream cheese that’s been softened up nice and good, 300g of sugar, six large eggs, a full 600ml of heavy cream—and I mean *heavy* cream—vanilla extract, salt, and just 30 grams of all-purpose flour. Keep these ready to go!
Ingredient Notes and Substitutions for Basque Cheesecake
Listen to me, the cream cheese *has* to be full-fat. You need that luxurious fat content to get the right silky texture; low-fat just won’t cooperate for this style of rich dessert. The flour you see? It’s only a tiny bit, just enough to give the filling a little backbone so it doesn’t turn into soup in the oven. That minimal use of flour is why this remains a perfectly delicious, naturally crustless cheesecake. You won’t miss having a crust one bit, trust me!
How to Prepare the Easy Cheesecake Recipe
Okay, getting this basque cheesecake ready is simple, but follow these steps exactly because the order and the texture of the batter are crucial for that signature look. First, get your oven cranked up to 400°F (200°C). The high heat is our secret weapon here!
Don’t forget the parchment paper trick! You need two overlapping sheets, letting them drape way over the sides of your 9-inch pan. This is what gives you those beautiful, crinkly, rustic edges that scream ‘authentic’ when it comes out. Trust me, you want those crinkles!
Prepping the Pan and Mixing the Basque Cheesecake Batter
Start by beating that softened cream cheese until it’s perfectly smooth—no lumps allowed! Then, beat in the sugar until it looks creamy and dreamy. Now, here’s where you slow down: add those six eggs one at a time, making sure each one is just mixed in before adding the next. After the eggs, gently pour in the heavy cream, salt, and vanilla. Lastly, sift the flour right over the top and grab your spatula. You’re just folding it in until you can’t see any white streaks anymore. Don’t try to over-mix this last step; gentle folding is key to keeping the air in the batter.
Baking Time and Temperature for Perfect Caramelization
Pour that admittedly thin batter into your paper-lined pan. Pop it in that hot oven for about 50 to 60 minutes. You are looking for the edges to be completely set—dark brown, maybe even a little black on top! But here’s the real test: the center should still have a noticeable wobble, like soft gelatin or custard. This is fantastic because we’re using a high heat method, which means you get to skip any tedious **No Water Bath Cheesecake** process. When you pull it out, it’s going to look dramatic, and that’s exactly what we want!
Tips for Success with Your Burnt Basque Cheesecake
Getting that perfect texture requires a little patience *after* the baking, I won’t lie about that part! These are the most important Cheesecake Baking Tips I learned so you don’t stress about your beautiful creation collapsing.
The Critical Cooling Process for Creamy Results
The worst thing you can do is rush this part! When you pull your beautiful, dark **basque cheesecake** out of the oven, you have to let it cool completely on the counter. And I mean *completely*—that means at least three solid hours at room temperature. This slow cooldown lets the structure firm up gently; if you try to chill it sooner, you’re going to get cracks. Once it’s room temperature, *then* you cover it and transfer it to the fridge for at least six hours, but preferably overnight. That long chill is what transforms that wobbly center into the silky, luscious custard we dream about!
Serving Suggestions for Your Decadent Dessert Ideas
You’ve done the time, you’ve nailed the wobble—now for the final presentation! I know it’s tempting to cut into that basque cheesecake straight from the fridge, but hold off! For the absolute best texture, you need to serve this as an impressive dinner party dessert when it’s brought back up to room temperature. That’s when that center really turns into that creamy heaven we were aiming for.
Honestly, this dessert is so rich, it truly needs nothing extra. A simple dusting of powdered sugar is just lovely. If you want a bit of color, some fresh raspberries or sliced strawberries cut through the richness perfectly. Or, if you’re looking for a deeper flavor pairing, maybe a side of something like cranberry orange bread crumbs sprinkled on the plate could be a fun, rustic twist!
Storage and Reheating Instructions for Basque Cheesecake
So, you have this absolute masterpiece sitting on your counter, and you can’t possibly eat the whole thing in one sitting—lucky you! Now, how do we keep that glorious texture perfect for later? The chilling process is non-negotiable for a proper basque cheesecake. You absolutely must let it chill for at least six hours, but I always, always recommend letting it sleep in the fridge overnight.
When it’s chilled, it firms up beautifully, making it easier to handle and slice, even though we love it softer. Cover the pan loosely with plastic wrap before it goes into the cold. It holds up really well for about three to four days in the refrigerator. I use a clip-on cover for my springform pan if I have one, just to protect the caramelized top from picking up any fridge odors.
Now, about reheating? Honestly, I don’t recommend it. This dessert relies so heavily on being served close to room temperature to get that signature creamy center. If you accidentally chilled it for too long and it feels a bit too dense, just pull it out about an hour before you plan to serve it. Let it warm up slowly on the counter. If you absolutely *must* warm a slice, maybe try warming it in the microwave for just five to ten seconds on the lowest setting, but be warned—too much heat and you lose that delicate custardy structure we worked so hard to create!
Variations: Loaf Pan Basque Cheesecake and More
The beauty of this incredible **basque cheesecake** is how forgiving it is, even if you don’t have a standard springform pan! I love that we can play around with the shape without messing up the flavor profile. If you’re baking for a smaller gathering or just want something visually different, jumping into the Loaf Pan Basque Cheesecake is a fantastic idea.
To bake this in a standard 9×5 inch loaf pan, you need to take special care with the parchment paper lining so it drapes high over the sides, just like we do with the round pan—it needs those rustic edges! The only real change is the time in the oven. Since the loaf pan is deeper, the heat takes longer to penetrate the very center. The recipe notes suggest knocking about 10 to 15 minutes off the baking time, but watch that wobble! It’s done when the center still has that significant sway, even if the total time is shorter.
If you want to mix things up flavor-wise, this crustless base is the perfect canvas. You can get creative without compromising the texture. Think about adding the zest of one orange or maybe a lemon right in with the cream cheese and sugar—that citrus brightness feels amazing next to the deep caramelization. It adds complexity to your gourmet homemade dessert without adding any extra steps to the mixing process!
Frequently Asked Questions About Basque Cheesecake
I know you’re going to love baking this, but sometimes little questions pop up when you break away from the main instructions. Don’t worry, I’ve run into these exact same issues over the years when making this basque cheesecake, and I’ve got the easy fixes right here for you!
Do I need to use parchment paper for the Basque Cheesecake?
Oh, absolutely you do! This isn’t just for easy cleanup, although that’s a huge bonus. The parchment paper is mandatory because it’s what allows the sides of the cheesecake to rise up high, then slump down as it cools, giving you those beautiful, crinkly, rustic sides that are the signature look. Trying to make this a clean-sided cake defeats the whole purpose of the intentionally messy, gorgeous basque cheesecake style. It also prevents sticking, which is key since we aren’t using a crust base!
Why is my cheesecake batter so thin before baking?
If you’re worried because your batter looks more like slightly thick heavy cream than the dense mixture you might expect from other baked cheesecakes, breathe! That is 100% normal for this particular recipe. This is why we call it a **Creamy Cheesecake Recipe**—it has a huge amount of heavy cream and no stabilizing crust holding it all in place initially. It liquefies to help it bake evenly, and trust me, that thinness is what guarantees that incredibly luxurious, custardy center when it finally sets up after chilling. Just pour it carefully and get it into the hot oven!
If you’re looking for other simple baking inspiration, check out my guide on easy no-bake mini cheesecakes for when you need a less intense baking session!
Nutritional Estimate for This Simple Ingredients Cheesecake
When we are making something this wonderfully rich and glorious, it’s smart to have an idea of the stats, although let’s be honest, this is a treat, not an everyday staple! Based on the sheer amount of full-fat cream cheese and heavy cream in this recipe, it is definitely a decadent dessert. Keep in mind that this is just an estimate based on the standard recipe breakdown, and your actual results might vary a tiny bit depending on the exact brands of ingredients you use.
This cheesecake has very few ingredients, which is great because it keeps the nutritional profile focused—mostly fat and a bit of sugar, as you’d expect from a top-tier **simple ingredients cheesecake**.
Here’s what you can generally expect per slice:
- Serving Size: 1 slice
- Calories: 450
- Sugar: 35g
- Sodium: 250mg
- Fat: 35g
- Saturated Fat: 22g
- Carbohydrates: 28g
- Protein: 8g
Remember, everything is relative! Because this is such a satisfying dessert, a single slice often does the trick, making these numbers manageable for a special occasion. Just enjoy that creamy center and caramelized crust!
PrintEasy Basque Burnt Cheesecake: Creamy Center, Caramelized Top

Make the best Basque Burnt Cheesecake with this simple, crustless recipe. You get a rich, creamy interior and a signature caramelized top with minimal effort and ingredients. This recipe requires no water bath.
- Prep Time: 15 min
- Cook Time: 60 min
- Total Time: 7 hours 15 min
- Yield: 10 servings 1x
- Category: Dessert
- Method: Baking
- Cuisine: Spanish
- Diet: Vegetarian
Ingredients
- 900g full-fat cream cheese, softened
- 300g granulated sugar
- 6 large eggs
- 600ml heavy cream (35% fat)
- 1 teaspoon vanilla extract
- 1/4 teaspoon salt
- 30g all-purpose flour
Instructions
- Preheat your oven to 400°F (200°C). Line a 9-inch springform pan with two large sheets of parchment paper, allowing the paper to overhang on all sides. This creates the rustic, crinkled edges characteristic of this dessert.
- In a large bowl, use an electric mixer to beat the softened cream cheese until completely smooth. Scrape down the sides of the bowl.
- Add the sugar to the cream cheese and beat until fully combined and creamy.
- Add the eggs one at a time, beating well after each addition until just incorporated. Do not overmix once the eggs are added.
- Slowly mix in the heavy cream, vanilla extract, and salt until the batter is uniform.
- Sift the flour over the batter and gently fold it in using a spatula until no streaks of flour remain.
- Pour the batter into the prepared pan. The batter will be thin.
- Bake for 50 to 60 minutes. The top should be deeply caramelized, almost black in spots, and the edges should be set. The center should still have a significant wobble, like soft custard.
- Remove the cheesecake from the oven. Let it cool completely on a wire rack at room temperature for at least 3 hours. The center will continue to set as it cools.
- Once cool, cover the pan loosely and chill in the refrigerator for at least 6 hours, or preferably overnight.
- To serve, carefully remove the outer ring of the springform pan and peel away the parchment paper. Serve this decadent dessert at room temperature for the best custardy center.
Notes
- For a loaf pan adaptation, use a standard 9×5 inch loaf pan lined with parchment paper and reduce the baking time by about 10-15 minutes.
- Serving this cheesecake at room temperature maximizes the creamy, soufflé-like texture of the interior.
- This recipe is naturally crustless, focusing purely on the rich cheese filling.
Nutrition
- Serving Size: 1 slice
- Calories: 450
- Sugar: 35g
- Sodium: 250mg
- Fat: 35g
- Saturated Fat: 22g
- Unsaturated Fat: 13g
- Trans Fat: 0.5g
- Carbohydrates: 28g
- Fiber: 0g
- Protein: 8g
- Cholesterol: 180mg