
Oh, fall baking! Is there anything better than that first crisp morning that just screams for cinnamon and spice? I love it, but let’s be honest, sometimes our autumn bakes end up tasting more like a delightful orange brick than a soft treat. Getting that perfect texture can feel like chasing smoke, especially when you’re mixing sourdough tang with something as dense as pumpkin.
That’s why I spent an entire season getting this recipe just right. If you’re ready for an incredibly moist Cinnamon Swirl pumpkin sourdough loaf that balances that artisan chew with deep, cozy autumn flavor, you’re in the right spot. Here at Cheffinity, Ava Sinclair believes that real food shouldn’t take all night—a core philosophy we use even when diving into longer projects than our quick weeknight dinners. That’s why every single step here has been tested, streamlined, and proven reliable for those of us juggling life past 5 PM. Trust me, this loaf is the answer to your dry bread dilemmas.
- Why This Cinnamon Swirl Pumpkin Sourdough Loaf Is Your New Favorite Autumn Baking Project
- Essential Ingredients for Your Pumpkin Sourdough Recipe
- Preparing the Cinnamon Swirl for Your Pumpkin Sourdough
- Step-by-Step Instructions for Artisan Pumpkin Bread
- Baking Technique for a Perfect Pumpkin Sourdough Loaf
- Tips for Success with Flavorful Sourdough Twists
- Storage and Reheating Instructions for Your Pumpkin Sourdough
- Frequently Asked Questions About Pumpkin Sourdough Baking
- Serving Suggestions for This Cozy Breakfast Sourdough
Why This Cinnamon Swirl Pumpkin Sourdough Loaf Is Your New Favorite Autumn Baking Project
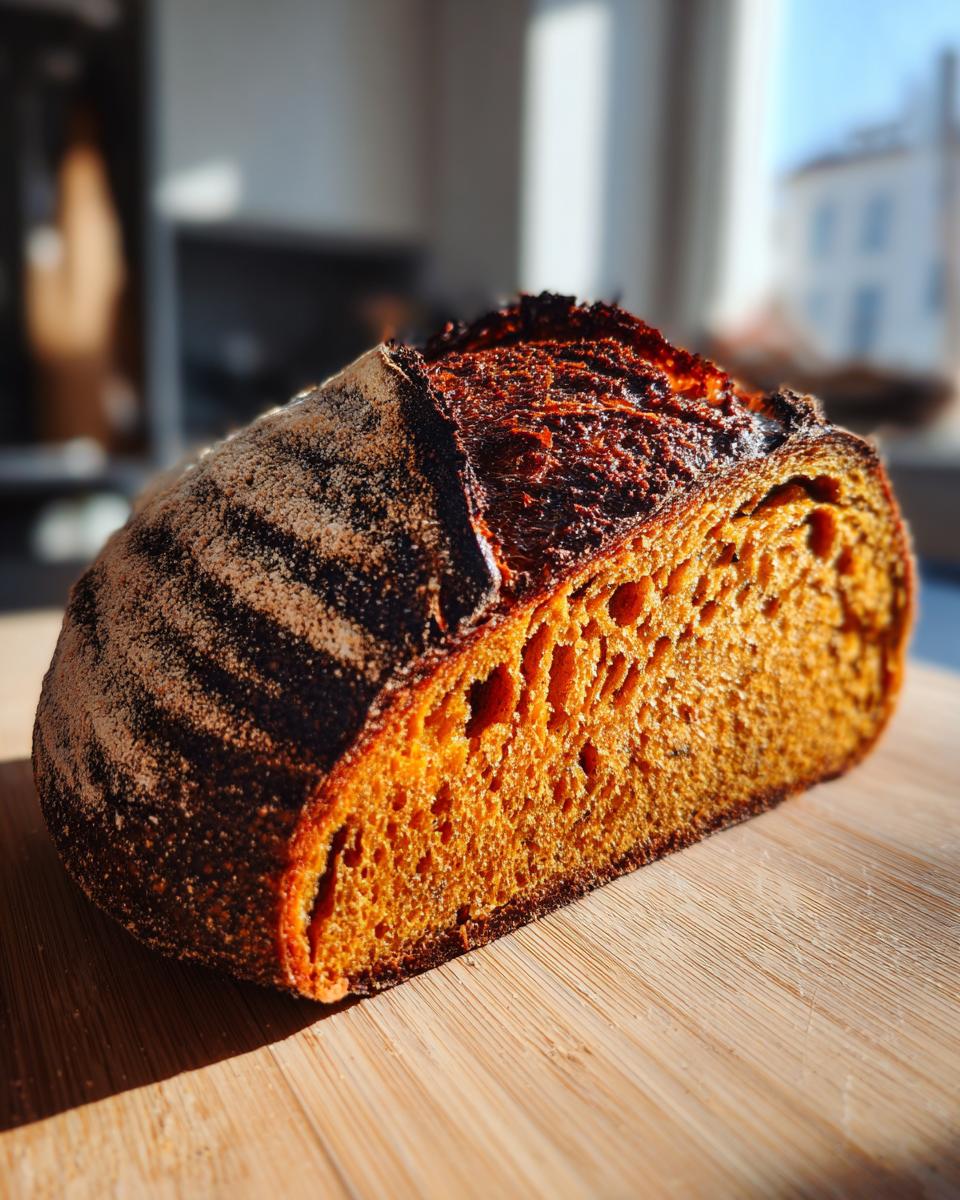
If you’ve been searching for the ultimate Artisan Pumpkin Bread that actually stays soft, this recipe is it! After testing batches until my kitchen looked like a total disaster zone—that’s my normal, by the way, getting a fantastic result is worth a little chaos—I nailed down the hydration and blend just right for a perfect crumb. This isn’t just bread; it’s a decadent, slightly tangy treat that smells like pure autumn comfort.
When I pull this pumpkin sourdough from the oven, it immediately becomes the star of the table. It’s hearty enough to pair with soups, but sweet enough to qualify as a proper Cozy Breakfast Sourdough treat. Ready to see how we keep it so moist?
Achieving That Perfect Moist Sourdough Baking Tip
The biggest issue with baking with pumpkin is that it can weigh down your dough, making it dense and gummy. My secret here is twofold: precise starter activity and relying on that beautiful pumpkin puree. The puree acts like a built-in moisturizer; it coats the flour particles, which helps lock in moisture during the entire process. This is the single best moist sourdough baking tip for any addition like this. Don’t skip the long proof, though; that develops the airy interior structure we’re aiming for!
The Appeal of Sweet Sourdough Loaf Variations
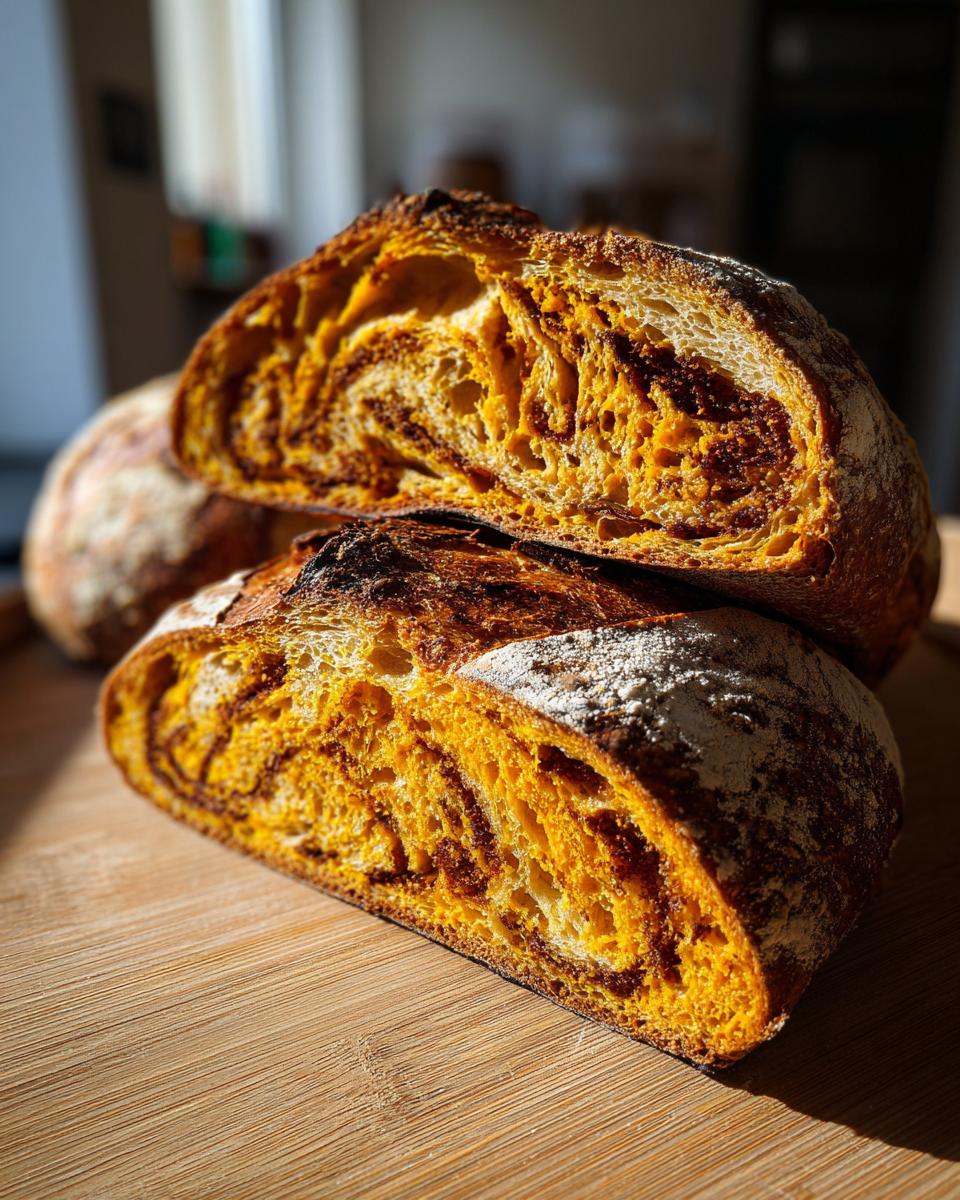
What really sets this loaf apart is that ribbon of butter and spice. It transforms the bread from good to *incredible*. That swirl moves this right into the category of a Sweet Sourdough Loaf that you’d be proud to serve at any gathering. Forget basic bread; you can totally serve this as your stunning Thanksgiving Sourdough Side. Honestly, just a thick slice toasted with salty butter is pure bliss.
Essential Ingredients for Your Pumpkin Sourdough Recipe
Alright, let’s talk about what actually goes into making this magic happen. When you’re baking something seasonal, the quality of the core components really shines through. We need to be precise here, which is why I’ve listed everything out clearly. My biggest non-negotiable, like with all my **Fall Sourdough Recipes**, is using pure pumpkin puree. Don’t even look at the pie filling container—that’s loaded with sugar and spices we don’t need!
You’ll need your active sourdough starter to be happy and bubbly, plenty of good flour for structure, and of course, the pumpkin doing the heavy lifting on moisture. This blend ensures we get that recognizable, slightly tangy note that makes sourdough so addictive, wrapped up in warmth.
Ingredient Notes and Substitution Guidance
Speaking of the starter, if you’re doing some serious clean-out and need Sourdough Starter Discard Recipes, you can totally use it here! If you only have discard instead of active starter, just swap in 150 grams of your discard, but make sure you dial back the water by 50 grams. That’s crucial for keeping the dough right.
And look, you absolutely need bread flour for this. We need those strong gluten chains to support the weight of the pumpkin and the swirl, so don’t try swapping in all-purpose flour unless you want a very sad, flat loaf. That extra protein in the bread flour makes all the difference in your final structure!
Preparing the Cinnamon Swirl for Your Pumpkin Sourdough
Okay, this filling is what turns our rustic pumpkin sourdough into the sweet dream we all crave. It’s incredibly simple, but don’t mess around with microwaving the butter too much—we need it soft, but not liquidy!
Grab a small bowl. You’ll combine the brown sugar, that beautiful cinnamon, and the softened, unsalted butter. Your goal here is a unified, thick paste. I usually use a small fork and mash everything together until it looks like wet, dark brown sand. You want to work it just enough so there are no dry pockets of sugar left, but stop before it gets oily or melts.
Seriously, this part sets up your entire flavor profile for the loaf. It needs to be spreadable when we introduce it to the dough later, so make sure everything is incorporated well enough that it won’t just run out when you roll the bread.
If you’ve ever made a traditional cinnamon roll filling, this is almost the exact same principle, just scaled down for a loaf. It’s the secret sauce for making this a real holiday showstopper. Check out how I do things for my apple crumble too; simple fillings always win!
Step-by-Step Instructions for Artisan Pumpkin Bread
Now we get into the real rhythm of making this Artisan Pumpkin Bread! We’re moving slow and steady here, which is how we beat that dreaded dry crumb. Remember, sourdough respects patience, so don’t rush the resting times. Start by mixing that active starter into your warm water. Then, whisk your flours together in a separate bowl and mix them into the wet ingredients until you just have a shaggy mess. Cover that bowl and let it sit for 30 minutes—that’s our autolyse rest, and it helps the flour hydrate beautifully.
Once rested, it’s time for the pumpkin and salt. Mix and knead gently by hand for about 5 to 7 minutes until the dough starts looking a little smoother around the edges. Then, we bulk ferment! You’ll perform four sets of stretch and folds, spacing them 30 minutes apart. This builds strength without tearing the structure.
Bulk Fermentation and Incorporating the Swirl
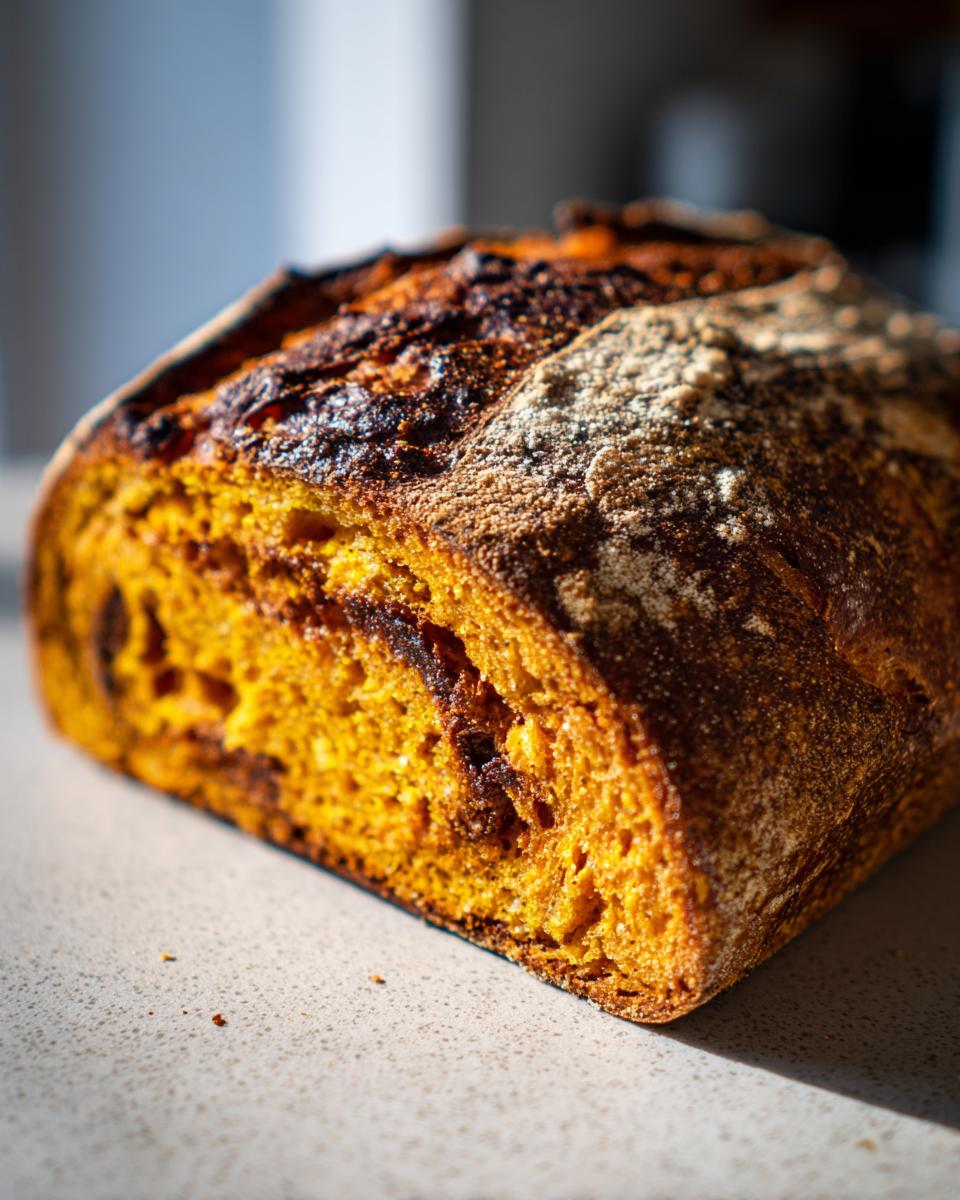
The magic happens right before that final set of folds. Lightly flour your counter and gently flatten your dough into a rough rectangle. Now, take that beautiful cinnamon butter paste we made and spread it as evenly as you can right across the surface. Don’t push so hard that you tear the gluten network in the dough! Think of coating it lightly. Once spread, roll the dough up tightly, just like you’re rolling up a jelly roll. Pinch that seam closed; any exposed filling is going to burn slightly while baking, so make sure it’s tucked in tight. This rolling action distributes that spice perfectly throughout your pumpkin sourdough.
Cold Proofing and Oven Preparation
After sealing that swirl in, shape your loaf into a tight ball (a boule) or an oblong shape (a batard) and place it seam-side up in a well-floured banneton basket. Cover it up and pop it into the fridge for its slow, flavor-building cold proof. Aim for 12 to 18 hours. This long rest is essential for developing that complex, slightly tangy pumpkin bake flavor!
While your dough is chilling, set your Dutch oven inside your regular oven and preheat everything to 500°F. You need a solid hour of intense heat to get that pot screaming hot. A hot pot is the ultimate secret weapon for getting a great oven spring on any easy breakfast sourdough loaf!
Baking Technique for a Perfect Pumpkin Sourdough Loaf
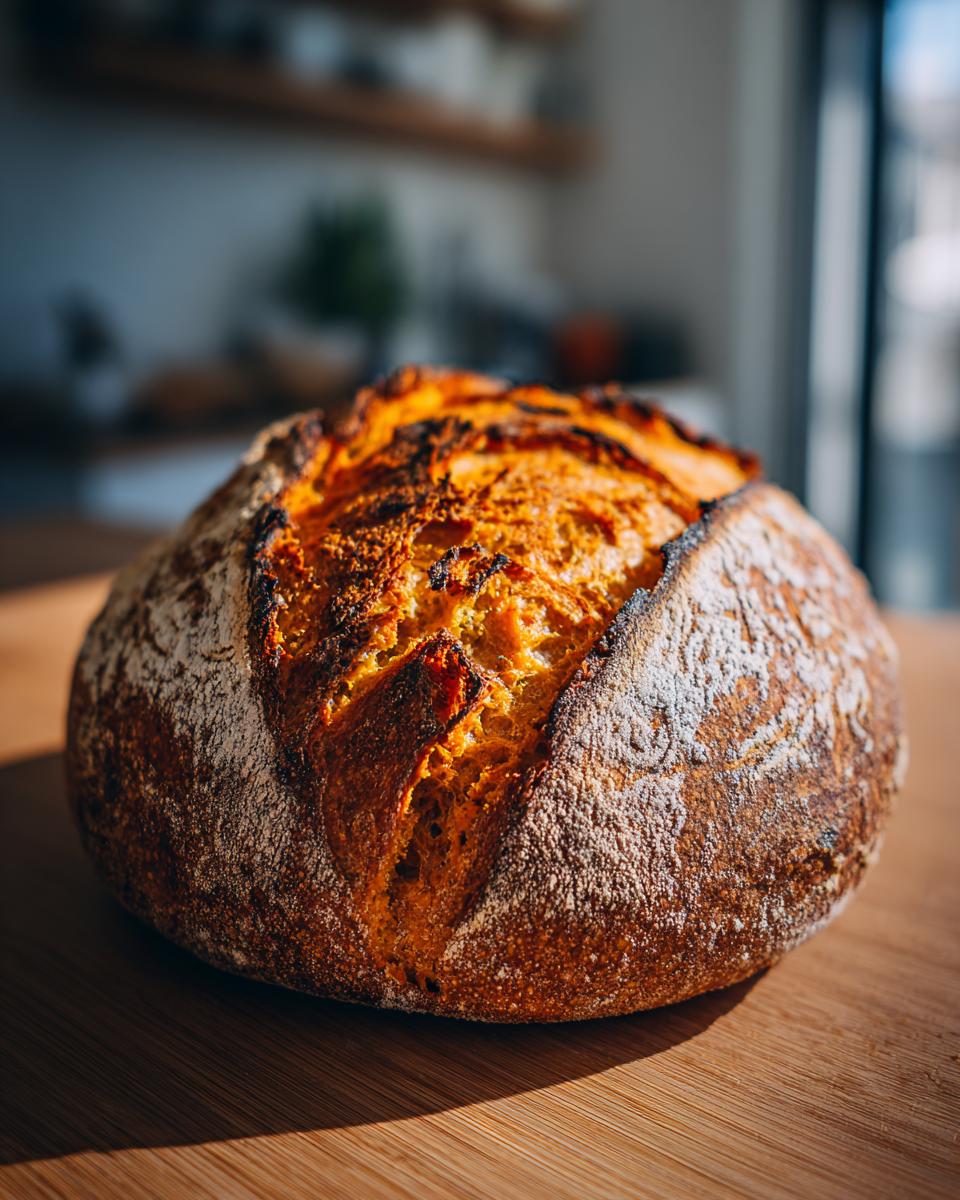
This is where the payoff happens! Remember that Dutch oven you preheated for a whole hour at 500°F? Get ready. Carefully take that heavy pot out. I always use my parchment paper sling here—you just gently lift the dough out of the basket and set it onto the paper you pre-cut. Less handling means a better shape!
Gently lower the dough, parchment and all, into the hot Dutch oven. Slap the lid on and immediately drop that temperature down to 500°F. We bake it covered for 20 minutes. This trapped steam is what gives us that beautiful oven spring and helps cook the center evenly.
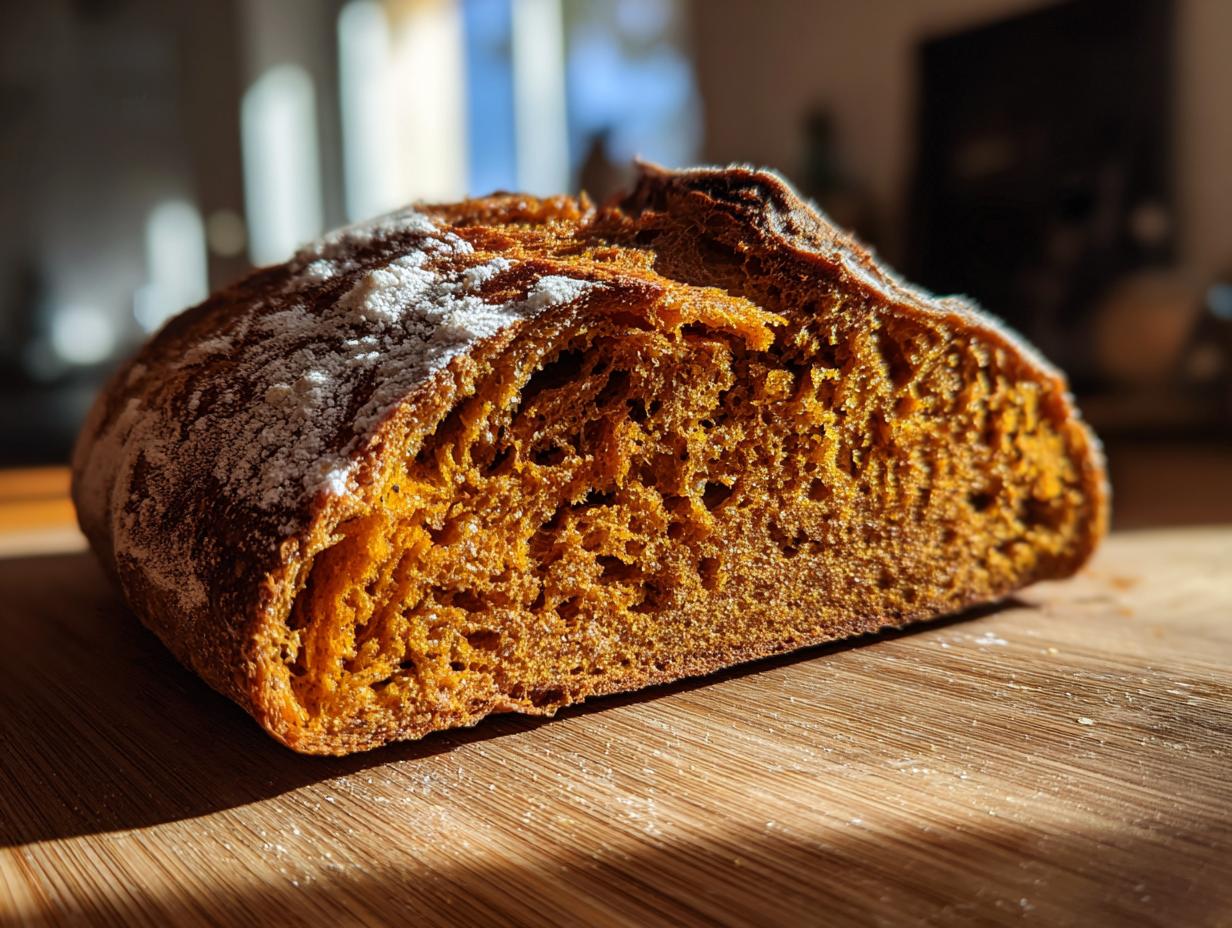
After 20 minutes, it’s time to reveal the loaf. Carefully lift the lid—watch out for that steam! Now, immediately slash your bread if you want, but seriously, the swirl is the star here. Reduce the heat down to 450°F, take the lid off, and let it bake for another 25 to 30 minutes until that crust is a deep, burnished mahogany. That deep color means you’ve hit the flavor sweet spot for your Best Sourdough Pumpkin Bread!
My final, absolute must-do tip? Don’t trust the look alone. Use an instant-read thermometer. For a perfectly baked, moist loaf, you want the internal temperature to hit between 208°F and 210°F. Pull it out right then! Resist cutting into it instantly, though; we cover that next.
Tips for Success with Flavorful Sourdough Twists
We’ve mastered the loaf, but I always encourage people to play around once they trust the base recipe. That’s the beauty of baking, right? It’s the “Flavorful Sourdough Twists” part of our journey! If you want to dial up the spice on your Pumpkin Spice Sourdough, I absolutely recommend grating a tiny bit of fresh nutmeg right into the swirl mixture next time. It smells incredible, and the flavor is much brighter than using just the pre-ground stuff.
Another thing Ava Sinclair always stresses is temperature control. Even in the summer, your fermentation schedule changes wildly. Pay attention to how your dough *feels* during the stretch and folds, not just the clock. If it’s warm in your kitchen, you might need one less set of folds, or your cold proof might be shorter. That intuition is what separates a good baker from someone who just follows directions.
And since we are talking about maximizing flavor and minimizing waste, let’s talk about what happens when you have leftovers!
Using Sourdough Discard in Pumpkin Sourdough Muffins
One of the best uses for leftover starter is turning this exact flavor profile into something quicker. If you have sourdough discard sitting around, you don’t need a whole loaf project. You can adapt this whole idea into a batch of Sourdough Pumpkin Muffins!
The concept is simple: if you make a quick bread (like the one mentioned in the resources), you can swap out a lot of the starter for that discard. It gives the muffins that lovely little tang and keeps them moist without needing a huge rise. I promise, once you start looking at your discard as a secret flavor-boosting ingredient instead of waste, your baking completely changes. For more ideas on maximizing efficiency in the kitchen, I often share tips in my posts about preservation and building flavor.
Just remember that the ratios will change wildly compared to a lean bread dough, so when adapting for muffins or coffee cakes, you’ll likely be removing more water than you would for a standard recipe.
Storage and Reheating Instructions for Your Pumpkin Sourdough
Don’t you dare cut into this gorgeous pumpkin sourdough loaf the second it comes out of the oven! I know, I know, the smell is intoxicating, but if you cut it warm, you’ll instantly deflate that beautiful crumb we worked so hard to create. Trust me on this one: this bread needs a full two hours, minimum, to cool completely on a wire rack. Cutting it early releases all the steam, and you end up with a denser, drier slice than you deserve.
Once it’s completely cool, storing it is simple. Since this loaf is so moist thanks to the pumpkin, it does fantastic simply wrapped tightly in beeswax wrap or a clean tea towel at room temperature for about three days. Keep it out of the fridge if you can; the temperature change tends to make bread go stale faster, and we want to preserve that soft texture.
If you know you won’t eat the whole loaf within three days—which, let’s be honest, happens in my house—freezing is your best friend for keeping that fresh flavor locked in. Slice the loaf first! That way, you can pull out just one or two slices whenever you need them. Wrap the slices tightly in plastic wrap, and then seal them inside a good freezer bag. It keeps beautifully for up to three months.
When you’re ready to enjoy a slice later, just pop it straight from the freezer into the toaster or toaster oven. It warms up perfectly with just enough crispness on the edge while keeping the center soft. It’s the best way to enjoy this Artisan Pumpkin Bread weeks after you’ve baked it!
Frequently Asked Questions About Pumpkin Sourdough Baking
I know getting into a new sourdough recipe can bring up a million little questions, especially when you’re dealing with additions like pumpkin. That’s totally normal! I’ve gathered the most common ones I get asked about this pumpkin sourdough loaf so you can bake with total confidence. If I didn’t cover your burning question, feel free to drop me a line—I love talking shop!
Can I skip the long cold proof in this pumpkin sourdough recipe?
Oh, you totally can, but you’re going to pay the price! Sourdough bread relies on that long, slow fermentation period in the cold to develop that amazing depth of flavor we associate with a Tangy Pumpkin Bake. If you skip it and do a short room-temperature proof, the bread will taste very yeasty, and the tanginess won’t bloom properly. Plus, the cold proof helps firm up the dough so it holds its shape better during the high heat of the initial bake. I say, put it in the fridge overnight and wake up to happy results!
What is the best way to use Sourdough Starter Discard Recipes in this loaf?
This is an easy swap, and one of my favorite ways to make this recipe fit into my weekly lineup! If you’re using Sourdough Starter Discard Recipes knowledge here, you’ll use 150 grams of your discard instead of the 100 grams of active starter. Crucially, you must also reduce the liquid in the recipe by 50 grams of water. The hydration levels of discard versus a peaked, active starter are different, so adjusting that water is key to avoiding a soupy mess. This is perfect for those of you who need a go-to recipe for using up discard!
How do I prevent my Artisan Pumpkin Bread from being too dense?
Density usually comes from two key areas: your starter’s performance or your shaping strength. First, make absolutely sure your 100g of active starter is bubbly, active, and has at least doubled after feeding—it needs to be ready to work! Second, during the final shaping stage, you need maximum surface tension. When you create that boule, really work the outer layer of the dough tight against itself. A tight skin on the outside helps trap the gases released by the yeast, forcing that lovely open, airy structure we want in an Artisan Pumpkin Bread. Think of it like pulling the outside skin drum-tight before placing it in the basket.
Need a binder or dip for serving later? Check out my thoughts on easy dumpling sauce—it pairs surprisingly well with savory slices!
Serving Suggestions for This Cozy Breakfast Sourdough
So, you pulled your beautiful, fragrant pumpkin sourdough loaf out of the oven, and now you’re wondering how to serve this masterpiece? This bread is so versatile, it barely needs anything, but why stop at good when you can have divine? For me, the morning is all about simple perfection.
First up: the classic move. Once it’s cooled just enough (remember that cooling rule!), slather a slice—still slightly warm—with real, good quality salted butter. The steam melts the butter right in, and the salt just cuts through that sweetness from the cinnamon swirl perfectly. It makes for an amazing Cozy Breakfast Sourdough moment, hands down.
If you’re feeling fancy, a thick schmear of plain cream cheese is heaven. The slight tang of the cheese contrasts beautifully with the earthy pumpkin and cinnamon spice. It makes the whole thing feel slightly more decadent, especially drizzled with a tiny bit of maple syrup.
Pairing This Rustic Fall Loaf with Meals
Don’t limit this gorgeous loaf to breakfast! Because it’s an Artisan Pumpkin Bread with great structure, it handles savory pairings beautifully, too. Slice it thick and use it instead of regular crusty bread alongside a big bowl of chili or creamy tomato soup. It adds that soft, warmly spiced background note that really elevates a simple dinner.
And think about holiday meals! If you need a show-stopping Thanksgiving Sourdough Side that isn’t just plain rolls, this is it. Serve thin slices alongside your gravy, or use it to sop up the last bits of turkey drippings. It’s unexpected and everyone always asks for the recipe! Seriously, you can even pair it with something rich like my Garlic Parmesan Mashed Potatoes if you want a real autumn flavor bomb on your plate.
Honestly, the best way to serve it is just warm, sliced thick, and shared immediately. That’s the Cheffinity way—making sure even our longest baking projects lead to fast, joyful eating!
PrintMoist Cinnamon Swirl Pumpkin Sourdough Bread
Bake this incredibly moist Pumpkin Sourdough Bread featuring a decadent cinnamon swirl. This recipe uses your sourdough starter to create a soft, artisan loaf perfect for cozy fall mornings or Thanksgiving treats.
- Prep Time: 30 min
- Cook Time: 50 min
- Total Time: 13 hours 50 min (includes long cold proof)
- Yield: 1 loaf 1x
- Category: Bread
- Method: Baking
- Cuisine: American
- Diet: Vegetarian
Ingredients
- 100g active sourdough starter (fed 4–6 hours prior)
- 350g warm water
- 500g bread flour
- 100g pumpkin puree (not pie filling)
- 50g whole wheat flour
- 10g fine sea salt
- For the Swirl: 100g brown sugar
- For the Swirl: 2 tablespoons ground cinnamon
- For the Swirl: 50g softened unsalted butter
Instructions
- Mix the active sourdough starter and warm water in a large bowl until combined.
- In a separate bowl, whisk together the bread flour and whole wheat flour. Add the flour mixture to the wet ingredients and mix until just combined into a shaggy dough.
- Cover the bowl and let the dough rest for 30 minutes (autolyse).
- Add the pumpkin puree and salt to the dough. Mix and knead by hand for 5-7 minutes until the dough starts to smooth out.
- Perform four sets of stretch and folds every 30 minutes during the bulk fermentation period.
- While the dough rests before the final set of folds, prepare the swirl filling by mixing the brown sugar, cinnamon, and softened butter until it forms a thick paste.
- Gently flatten the dough into a rough rectangle on a lightly floured surface. Spread the cinnamon butter mixture evenly over the surface of the dough.
- Roll the dough up tightly like a jelly roll. Pinch the seam closed.
- Shape the dough into a tight boule or batard and place it seam-side up in a well-floured banneton basket.
- Cover the basket and cold proof the dough in the refrigerator for 12-18 hours.
- Preheat your oven to 500°F (260°C) with a Dutch oven inside for one hour.
- Carefully remove the hot Dutch oven. Gently turn the cold dough out onto parchment paper. Score the top of the loaf as desired.
- Carefully lower the dough (using the parchment paper as a sling) into the hot Dutch oven. Cover with the lid.
- Bake covered for 20 minutes at 500°F (260°C).
- Reduce the oven temperature to 450°F (232°C), remove the lid, and continue baking for another 25-30 minutes until the crust is deep golden brown.
- Remove the loaf from the Dutch oven and cool completely on a wire rack before slicing to keep your crumb moist.
Notes
- For the best flavor development, use pumpkin puree you have made yourself from roasted pumpkin.
- If you have sourdough discard instead of active starter, use 150g of discard and reduce the water by 50g.
- To achieve a very moist sourdough crumb, avoid over-baking; the internal temperature should reach 208-210°F (98-99°C).
Nutrition
- Serving Size: 1 slice
- Calories: 320
- Sugar: 12g
- Sodium: 350mg
- Fat: 6g
- Saturated Fat: 3g
- Unsaturated Fat: 3g
- Trans Fat: 0g
- Carbohydrates: 58g
- Fiber: 3g
- Protein: 10g
- Cholesterol: 10mg